Integration Workflows
Overview
The workflows below are grouped into two milestones.
MVP for Canton Coin contains the minimum viable product (MVP) workflows for integrating Canton Coin (CC) into the exchange. It comes with the limitation that both the exchange and the customers need to set up a
TransferPreapprovalcontract to enable 1-step transfers of CC.MVP for all Canton Network Tokens contains the additional workflows required to support all CN tokens. They are the workflows to onboard a new token and to support multi-step transfers for both deposits and withdrawals. Multi-step transfers gives the receiver a choice to: reject an incoming transfer as well as enable additional asynchronous checks on transfers by the token admin (e.g. KYC/AML checks).
Further extensions of these two MVPs to address Day-2 requirements are explored in Integration Extensions.
MVP for Canton Coin
Note
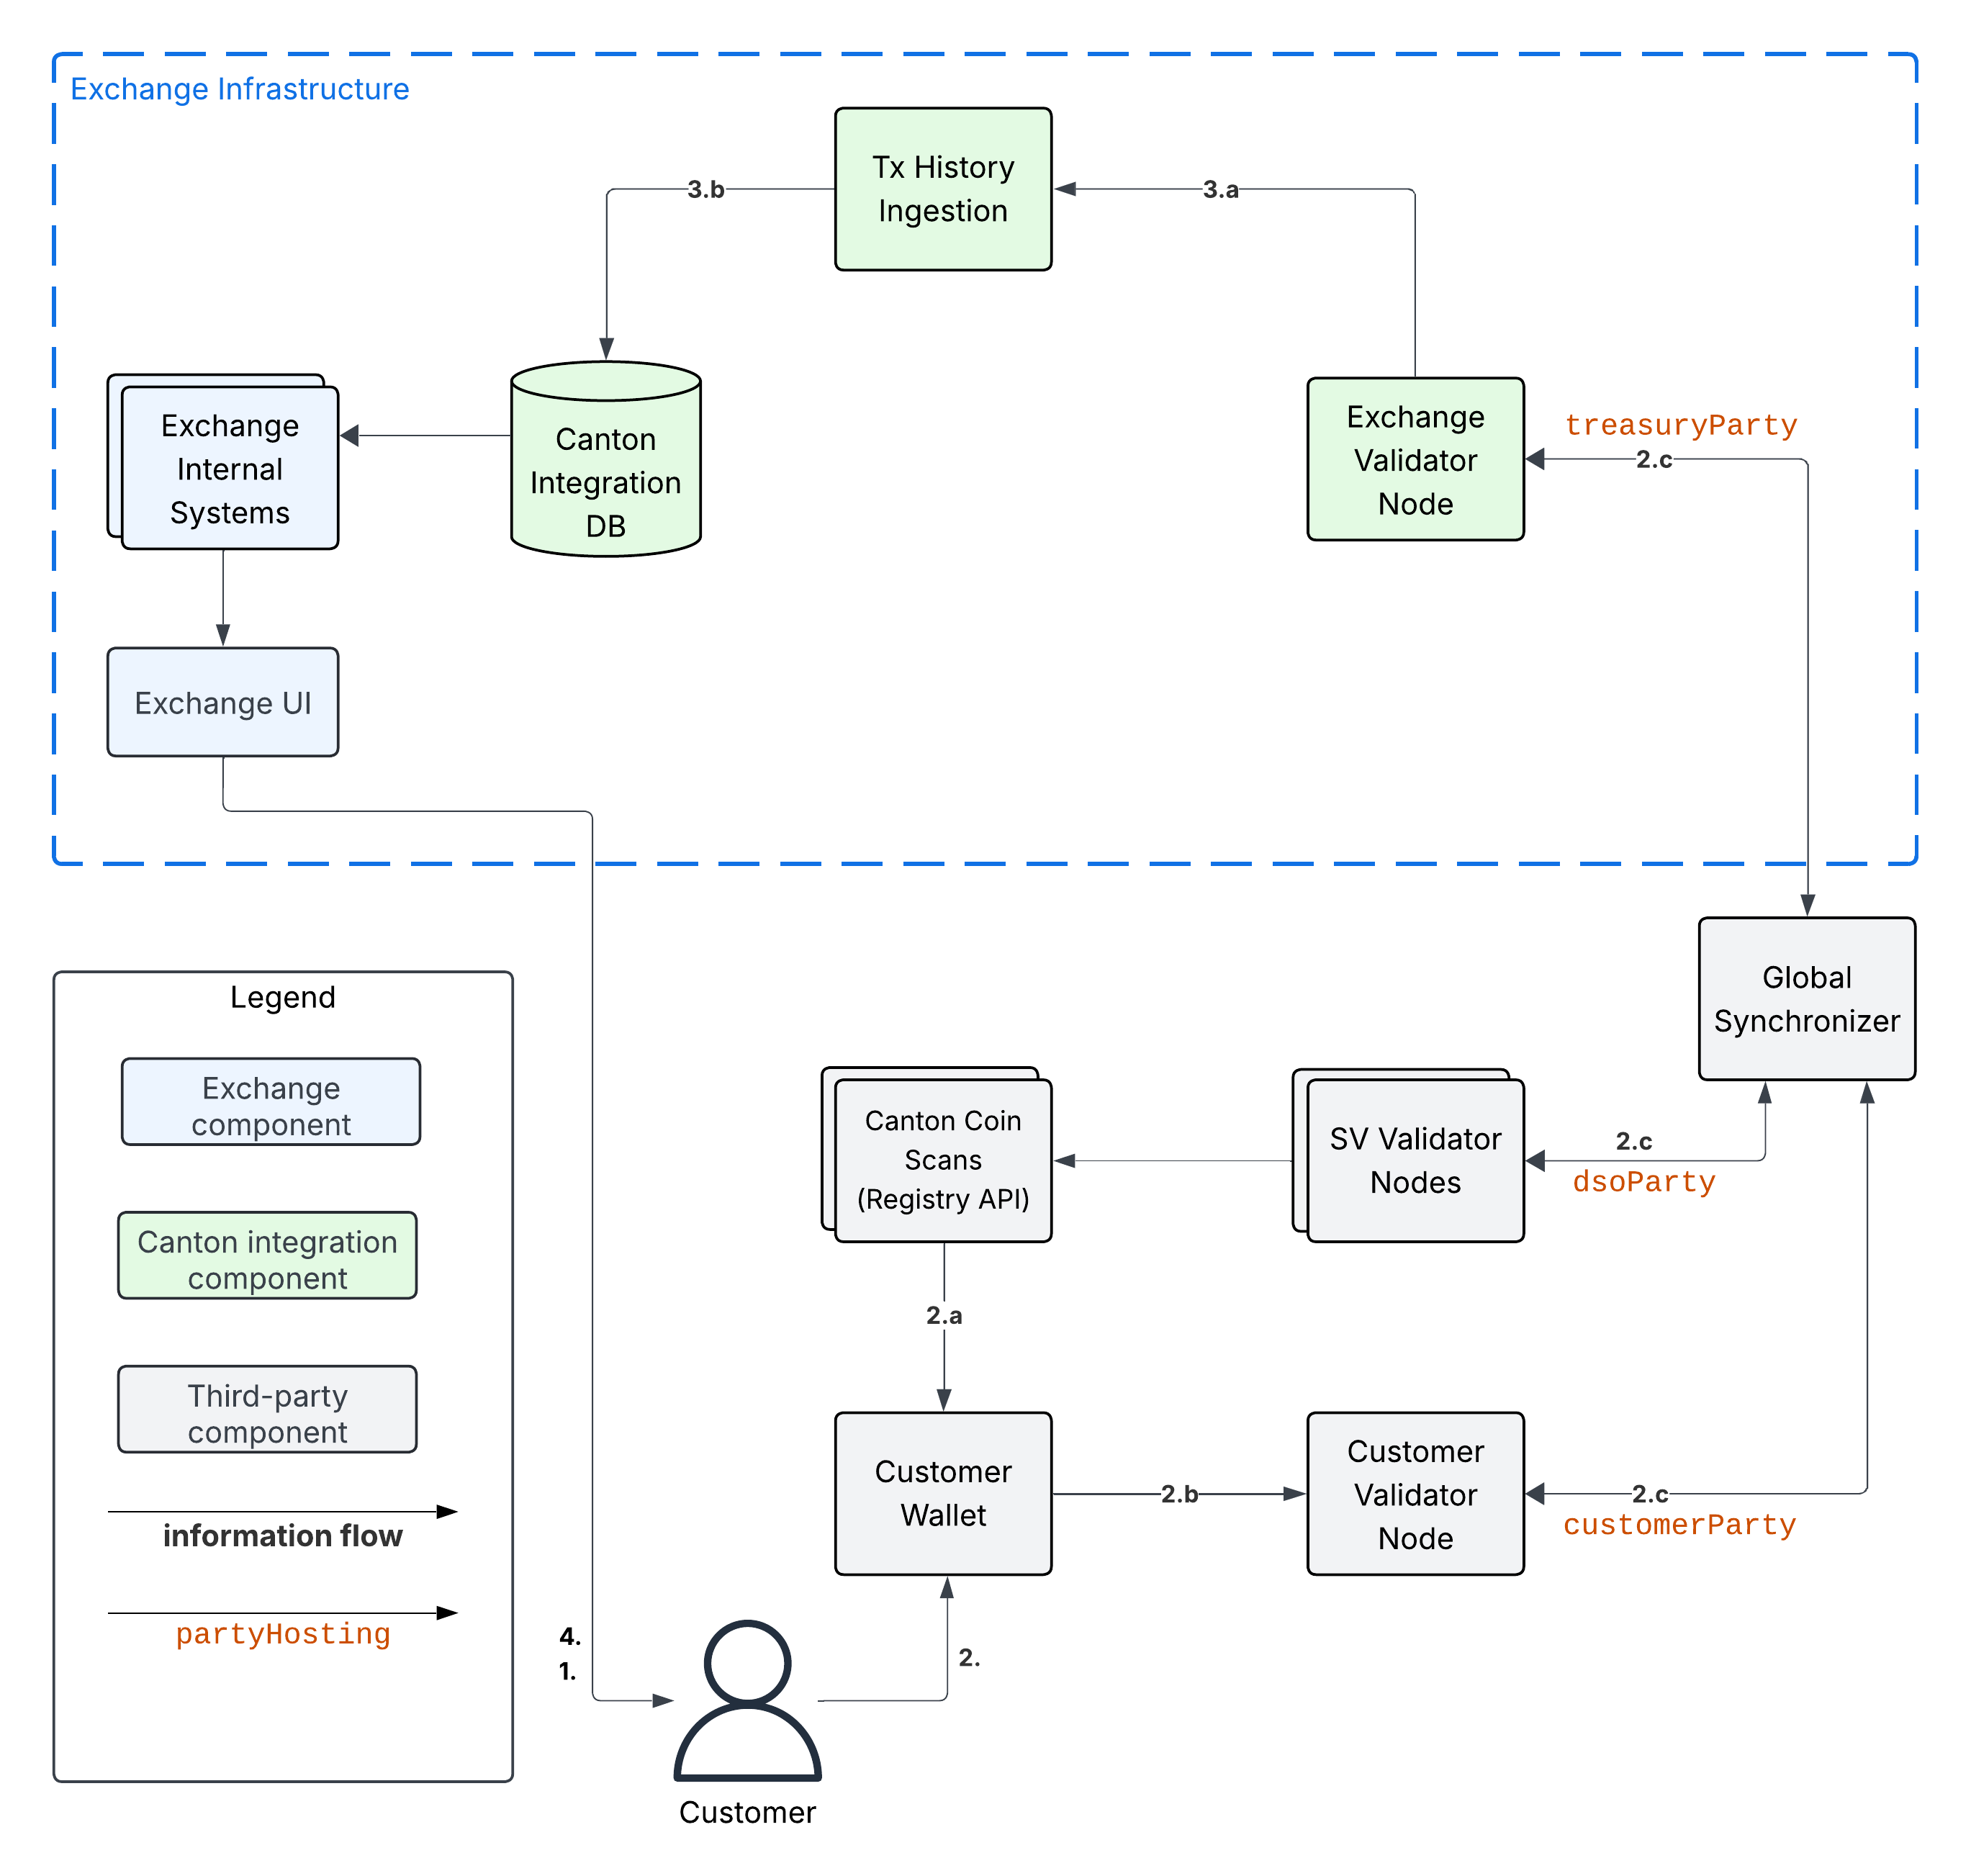
The diagrams in the sections below adapt the diagram from the Information Flows section to the Canton Coin workflow. The adaptations are:
The role of the
adminPartyis assumed by thedsoParty, which is the token admin party for CC. ThedsoPartyis a decentralized party that is hosted on the validator nodes run by Super Validator (SV) operators. A confirmation threshold of 2/3 is used to achieve Byzantine fault-tolerance for its transaction validation.The role of the Registry API Server is taken over by the Canton Coin Scan services that every SV operator runs. They serve the Registry API for CC. See Reading from Canton Coin Scan for more information about how to reliably read from multiple Canton Coin Scan instances.
1-Step Deposit Workflow
Assumptions:
The Exchange has set up a CC
TransferPreapprovalfor theirtreasuryPartyas explained in Setup the treasury party.The Exchange has associated deposit account “abc123” with the Customer in the Canton Integration DB.
Example flow:
Customer uses Exchange UI to retrieve
treasuryPartyand the deposit account-id (“abc123”) to use for the depositCustomer uses Customer Wallet to initiate a token standard transfer of 100 CC to
treasuryPartywith metadata keysplice.lfdecentralizedtrust.org/reasonset to “abc123”.Customer Wallet selects CC
HoldingUTXOs to fund the transfer and queries Canton Coin Scan to retrieve registry-specificTransferFactoryand extra transfer context. The returned data includes theTransferPreapprovalfor thetreasuryParty.Customer wallet submits the command to exercise the
TransferFactory_Transferchoice together with the extra transfer context. The resulting transaction:archives the funding CC
HoldingUTXOscreates a CC
HoldingUTXO with contract-idcoid234owned by thetreasuryPartycreates another CC
HoldingUTXO for the change owned by the Customer.
The resulting transaction gets committed across the Customer, Exchange, and SV validator nodes. It is assigned an update-id
upd567and a record timet1by the Global Synchronizer. It is assigned offsetoff1by the Exchange Validator Node. (The other validator nodes will have a differentoffsetvalue.)
Tx History Ingestion observes
upd567at record timet1with offsetoff1and updates the Canton Integration DB as follows.Tx History Ingestion parses
upd567using the token standard tx history parser from the Wallet SDK to determine:The deposit amount of 100 CC.
The deposit account “abc123” from the
splice.lfdecentralizedtrust.org/reasonmetadata value.The new
HoldingUTXOcoid234owned by thetreasuryParty
Tx History ingestion writes the following in a single, atomic transaction to the Canton Integration DB
The latest ingested update-id
upd567, its record timet1, its offsetoff1, and thesynchronizerIdof the Global Synchronizer.The new CC
HoldingUTXOcoid234for the 100 CC that was received.The credit of 100 CC on the Customer’s account at the exchange.
Customer observes the successful deposit in their Exchange UI, whose data is retrieved from the Canton Integration DB via the Exchange Internal Systems.
1-Step Withdrawal Workflow

Assumptions:
Customer set up a CC
TransferPreapprovalfor theircustomerParty.
Example flow:
Customer requests withdrawal of 100 CC to
customerPartyusing the Exchange UI.Exchange Internal Systems process that request and update the Canton Integration DB to store:
The deduction of 100 CC from the Customer’s trading account.
The pending withdrawal with id
wid123of 100 CC tocustomerParty.The CC
HoldingUTXOscoidsto use to fund the transfer tocustomerPartyforwid123. See UTXO Selection and Management for more information.The target record time
trecTgton the Global Synchronizer until which the transaction for the CC transfer must be committed. Thecoidsare considered to be reserved for funding the transfer for withdrawalwid123untiltrecTgthas passed.
Withdrawal Automation queries the Canton Integration DB in a polling fashion, observes the pending withdrawal
wid123, and commits the corresponding CC transfer as follows.Withdrawal Automation queries Canton Coin Scan to retrieve the
TransferFactoryfor CC and extra transfer context.Withdrawal automation checks that transfer is indeed a 1-step transfer by checking that
transfer_kind="direct"in the response from Canton Coin Scan. If that is not the case, then it marks the withdrawal as failed in the Canton Integration DB with reason “lack of CC transfer-preapproval forcustomerParty” and stops processing.Withdrawal Automation prepares, signs, and submits the command to exercise the
TransferFactory_Transferchoice with the exclusive upper-bound for the record time of the commit set totrecTgt. It also sets the value for keysplice.lfdecentralizedtrust.org/reasonin theTransfermetadata towid123.The resulting transaction:
archives the CC
HoldingUTXOscoidsused to fund the transfercreates a CC
HoldingUTXO with contract-idcoid345owned by thecustomerPartycreates a CC
HoldingUTXO with contract-idcoid789owned bytreasuryPartyrepresenting the change returned to the Exchange.
The transaction is committed across the Customer, Exchange, and SV validator nodes. It is assigned an update-id
upd567and a record timet1<trecTgtby the Global Synchronizer. It is assignedoff1by the Exchange Validator Node. It is assignedoff2by the Customer Validator Node.
Tx History Ingestion observes
upd567att1with offsetoff1and updates the Canton Integration DB as follows.Tx History Ingestion parses
upd567using the token standard tx history parser from the Wallet SDK to determine:The withdrawal-id
wid123from thesplice.lfdecentralizedtrust.org/reasonmetadata value.The new
HoldingUTXOcoid789owned by thetreasuryParty
Tx History ingestion writes the following in a single, atomic transaction to the Canton Integration DB
The latest ingested update-id
upd567, its record timet1and offsetoff1.The successful completion of withdrawal
wid123by the transaction with update-idupd567at record timet1.The deduction of 100 CC from the Customer’s trading account.
The archival of the CC
HoldingUTXOscoids.The new CC
HoldingUTXOcoid789for the change returned after funding the CC transfer.
Customer Wallet observes
upd567att1with offsetoff2on the Customer Validator Node, parses it using the token standard tx history parser and updates its UI as follows:Its tx history shows the receipt of 100 CC from
exchangePartywith “Reason”wid123that was committed as updateupd567att1.Its holding listing shows the new CC
Holdingwith contract idcoid345.
Customer observes the completion of the withdrawal at
t1in the Exchange UI and the receipt of the expected funds in their Customer Wallet.
UTXO Selection and Management
Executing a withdrawal requires selecting Holding UTXOs to fund the withdrawal,
as described for example in 1-Step Withdrawal Workflow. You likely already have a UTXO management strategy in place for your existing UTXO-chain integrations. Here some considerations to take into account when adapting your strategy to work with Canton:
Canton Coin charges a small holding fee of about $1 per year for each
HoldingUTXO to allow archiving dust coins once their holding fee surpasses their value.Canton Coin limits the number of UTXOs for a single transfer to 100
HoldingUTXOs to avoid large transactions that are expensive to process.Canton Coin transactions also merge all input
HoldingUTXOs and return the change to the sender as a singleHoldingUTXO to allow batching the merging ofHoldingUTXOs with transfers.Other tokens are likely to follow similar strategies for the same rationale.
At the time of writing (2025-08-29), the Canton Network Token Standard recommends to use self-transfers (i.e.,
sender=receiver) to be used to mergeHoldingUTXOs into twoHoldingUTXOs: one for the transferredamountand another one for the change. It does not (yet) support requesting multipleHoldingUTXOs to be created for the change.
We therefore recommend the following approach:
Limit the number of input UTXOs to less than 100 UTXOs per transfer. Thus staying with the Canton Coin limits and keeping transaction size small, which also helps you to reduce your traffic spend when having to retry transaction execution.
Consider using a UTXO selection strategy for withdrawals that favors smaller UTXOs so that they get merged automatically as part of executing transfers.
Consider keeping a pool of k large amount UTXOs to be able to execute up to k withdrawals at the same time. Run a periodic background job to manage this pool using self-transfers.
From an implementation perspective, these self-transfers are a special kind of withdrawal. We thus recommend to implement them using the same code path as withdrawals: start with writing the self-transfer request into the Canton Integration DB and have the Withdrawal Automation execute it.
MVP for all Canton Network Tokens
The MVP for supporting all Canton Network tokens builds on the MVP for Canton Coin. The key changes required are:
Change Tx History Ingestion to also ingest the
TransferInstructionUTXOs, which are used by the Canton Network Token Standard to represent in-progress transfers (see docs, code).Adjust the Exchange UI to show the status of in-progress transfers.
Adjust the user funds tracking done as part of Tx History Ingestion to credit funds back to the user if they reject a withdrawal transfer. Consider deducting a fee for the failed withdrawal.
Implement the Multi-Step Deposit Automation service to auto-accept incoming transfers that are pending receiver acceptance. Ensure that the deposit address is known before accepting the transfer.
Add support for configuring the URL of a token admin’s Registry API Server and to deploy their .dar files as described in Canton Network Token Onboarding.
The sections below provide worked examples for the resulting multi-step deposit and withdrawal workflows. All examples assume that:
There is a token admin called Acme who issues a token called AcmeToken on the Canton Network and operates their own Admin Validator Node and their own Registry API Server.
The Exchange and Customer have onboarded AcmeToken as per Canton Network Token Onboarding.
Multi-Step Deposit Workflow
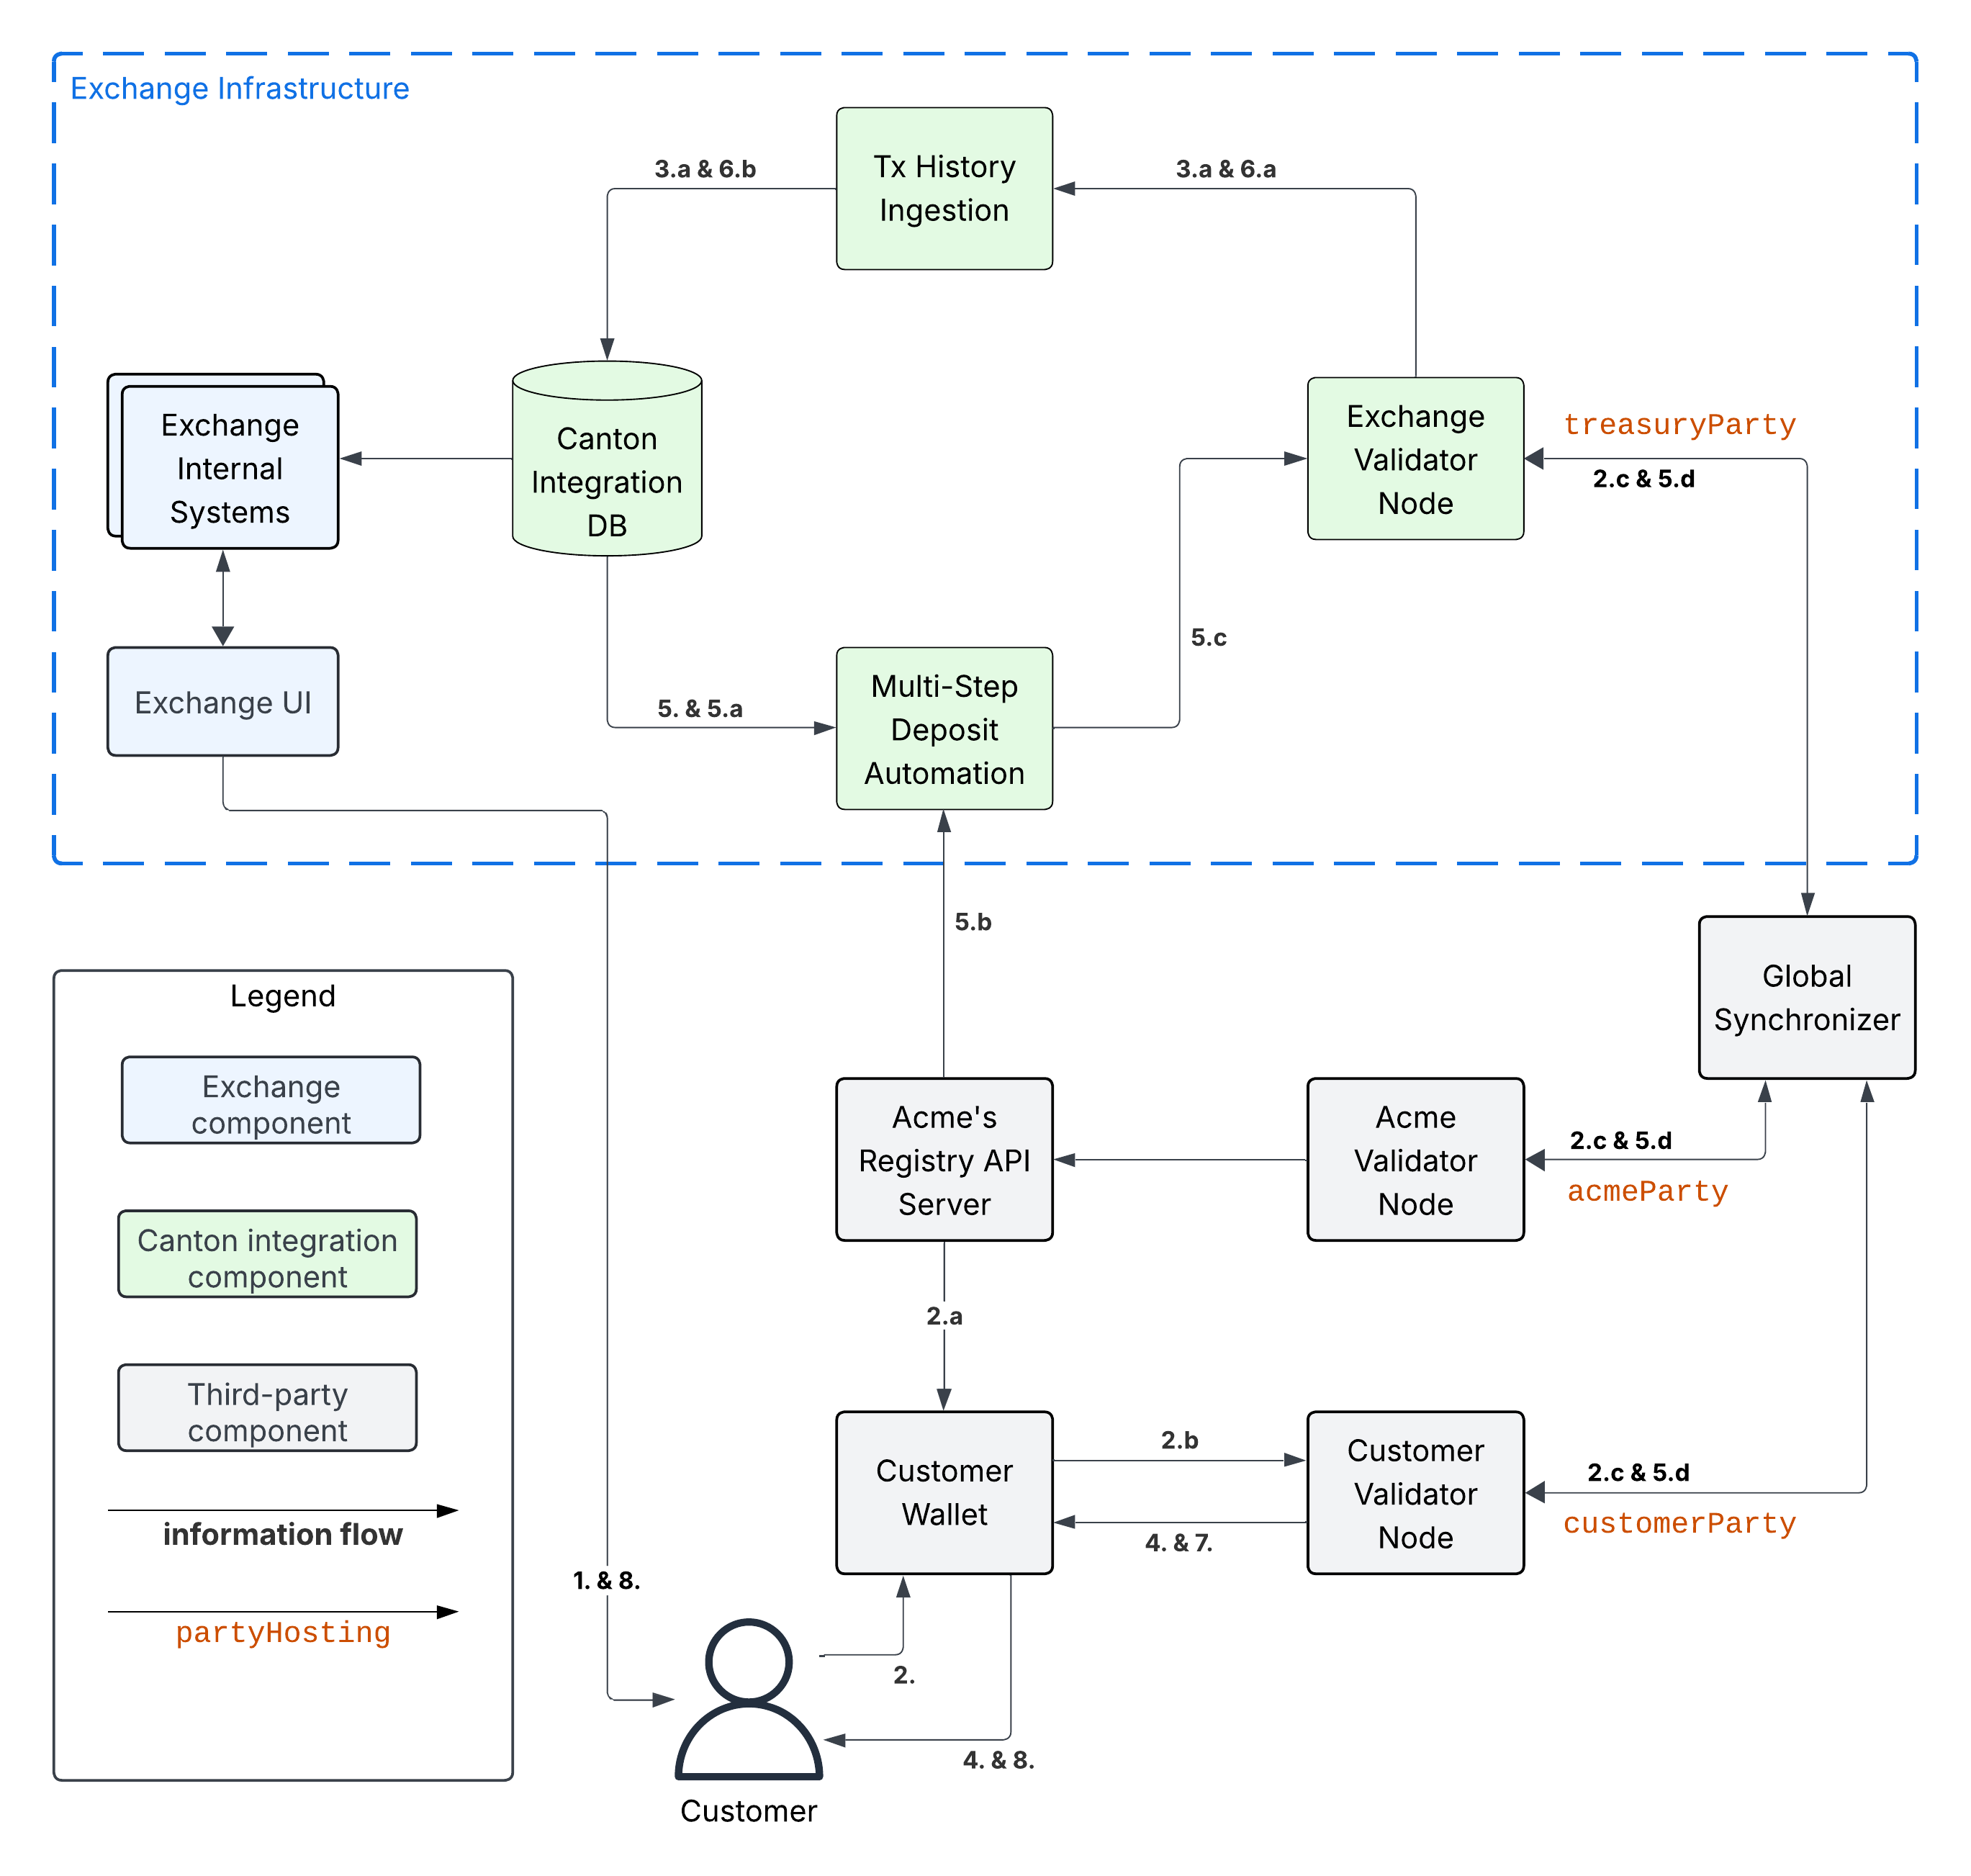
Example flow: deposit offer and acceptance
The flow uses essentially the same initial four steps as the 1-Step Deposit Workflow above. We list them in full for completeness.
Customer uses Exchange UI to retrieve
treasuryPartyand deposit account-id “abc123” to use for the deposit.Customer uses Customer Wallet to initiate a token standard transfer of 100 AcmeToken to
treasuryPartywith metadata keysplice.lfdecentralizedtrust.org/reasonset to “abc123”.Customer Wallet selects AcmeToken
HoldingUTXOs to fund the transfer and queries Acme’s Registry API Server to retrieve registry-specificTransferFactoryand extra transfer context. The URL for this server was configured in the Customer Wallet as part of Canton Network Token Onboarding.Customer wallet submits the command to exercise the
TransferFactory_Transferchoice together with the extra transfer context. The resulting transaction:archives the funding AcmeToken
HoldingUTXOscreates a locked 100 AcmeToken
HoldingUTXO with contract-idcoid234owned by thecustomerPartycreates another AcmeToken
HoldingUTXO for the change owned by the Customer.
The transaction also creates a
TransferInstructionUTXO with contract-idcoid567, which represents the transfer offer to the Exchange.The resulting transaction gets committed across the Customer, Exchange, and Acme validator nodes. It is assigned an update-id
upd567and a record timet1by the Global Synchronizer. It is assigned offsetoff1by the Exchange Validator Node.
Tx History Ingestion observes
upd567att1with offsetoff1and updates the Canton Integration DB as follows.Tx History Ingestion parses
upd567using the token standard tx history parser from the Wallet SDK to determine:The deposit amount of 100 AcmeToken.
The deposit account “abc123” from the
splice.lfdecentralizedtrust.org/reasonmetadata value.The
TransferInstructionUTXOcoid567representing the transfer offer for the deposit.
Tx History ingestion writes the following in a single, atomic transaction to the Canton Integration DB
The latest ingested update-id
upd567its record timet1and offsetoff1.The
TransferInstructionUTXOcoid567representing the transfer offer fromcustomerPartyfor a deposit of 100 AcmeToken in account “abc123”.
Customer Wallet ingests update
upd567and Customer observes the pending transfer offer for the deposit in the Customer Wallet. Customer also sees the 100 AcmeTokenHoldingUTXOcoid234locked to the deposit.
This is where the main difference to the 1-Step Deposit Workflow starts. The Multi-Step Deposit Automation service will now auto-accept the transfer offer.
The Multi-Step Deposit Automation regularly queries the Canton Integration DB for pending transfer offers for known deposit accounts. It thus observes the pending transfer offer
coid567and accepts it as follows.Multi-Step Deposit Automation retrieves the URL for Acme’s Registry API Server from the Canton Integration DB.
Multi-Step Deposit Automation queries Acme’s Registry API Server to retrieve the extra context to exercise the
TransferInstruction_Acceptchoice oncoid567.Multi-Step Deposit Automation prepares, signs, and submits the command to exercise the
TransferInstruction_Acceptchoice oncoid567.The resulting transaction gets committed across the Customer, Exchange, and Acme validator nodes. It is assigned an update-id
upd789and a record timet2the Global Synchronizer. It is assignedoff3by the Exchange Validator Node. The resulting transaction has the following effects:It archives the
TransferInstructionUTXOcoid567.It archives the locked 100 AcmeToken
HoldingUTXOcoid234owned by thecustomerParty.It creates a 100 AcmeToken
HoldingUTXOcoid999owned by thetreasuryParty.
At this point the workflow again proceeds the same way as the 1-Step Deposit Workflow.
Tx History Ingestion observes
upd789att2with offsetoff3and updates the Canton Integration DB as follows.Tx History Ingestion parses
upd789using the token standard tx history parser from the Wallet SDK to determine:The deposit amount of 100 AcmeToken.
The deposit account “abc123” from the
splice.lfdecentralizedtrust.org/reasonmetadata value.
Tx History ingestion writes the following in a single, atomic transaction to the Canton Integration DB
The latest ingested update-id
upd789, its record timet2and offsetoff3.The new AcmeToken
HoldingUTXOcoid999for the 100 AcmeToken that was received.The credit of 100 AcmeToken on the Customer’s account at the exchange.
Customer Wallet observes
upd789att2on the Customer Validator Node, parses it using the token standard tx history parser and updates its UI as follows:Its tx history shows the successful transfer of 100 AcmeToken to
exchangePartywith “Reason”wid123that was committed as updateupd789att2.
Customer observes the successful deposit in their Exchange UI, whose data is retrieved from the Canton Integration DB via the Exchange Internal Systems.
Example: handling deposits with unknown deposit accounts
To minimize traffic cost, we recommend not acting on deposits with unknown deposit accounts. The sender can use their wallet to withdraw the offer.
Ingesting deposit offers with unknown deposit accounts is still valuable to allow the exchange’s support team to handle customer inquiries about these transfers.
Multi-Step Withdrawal Workflow
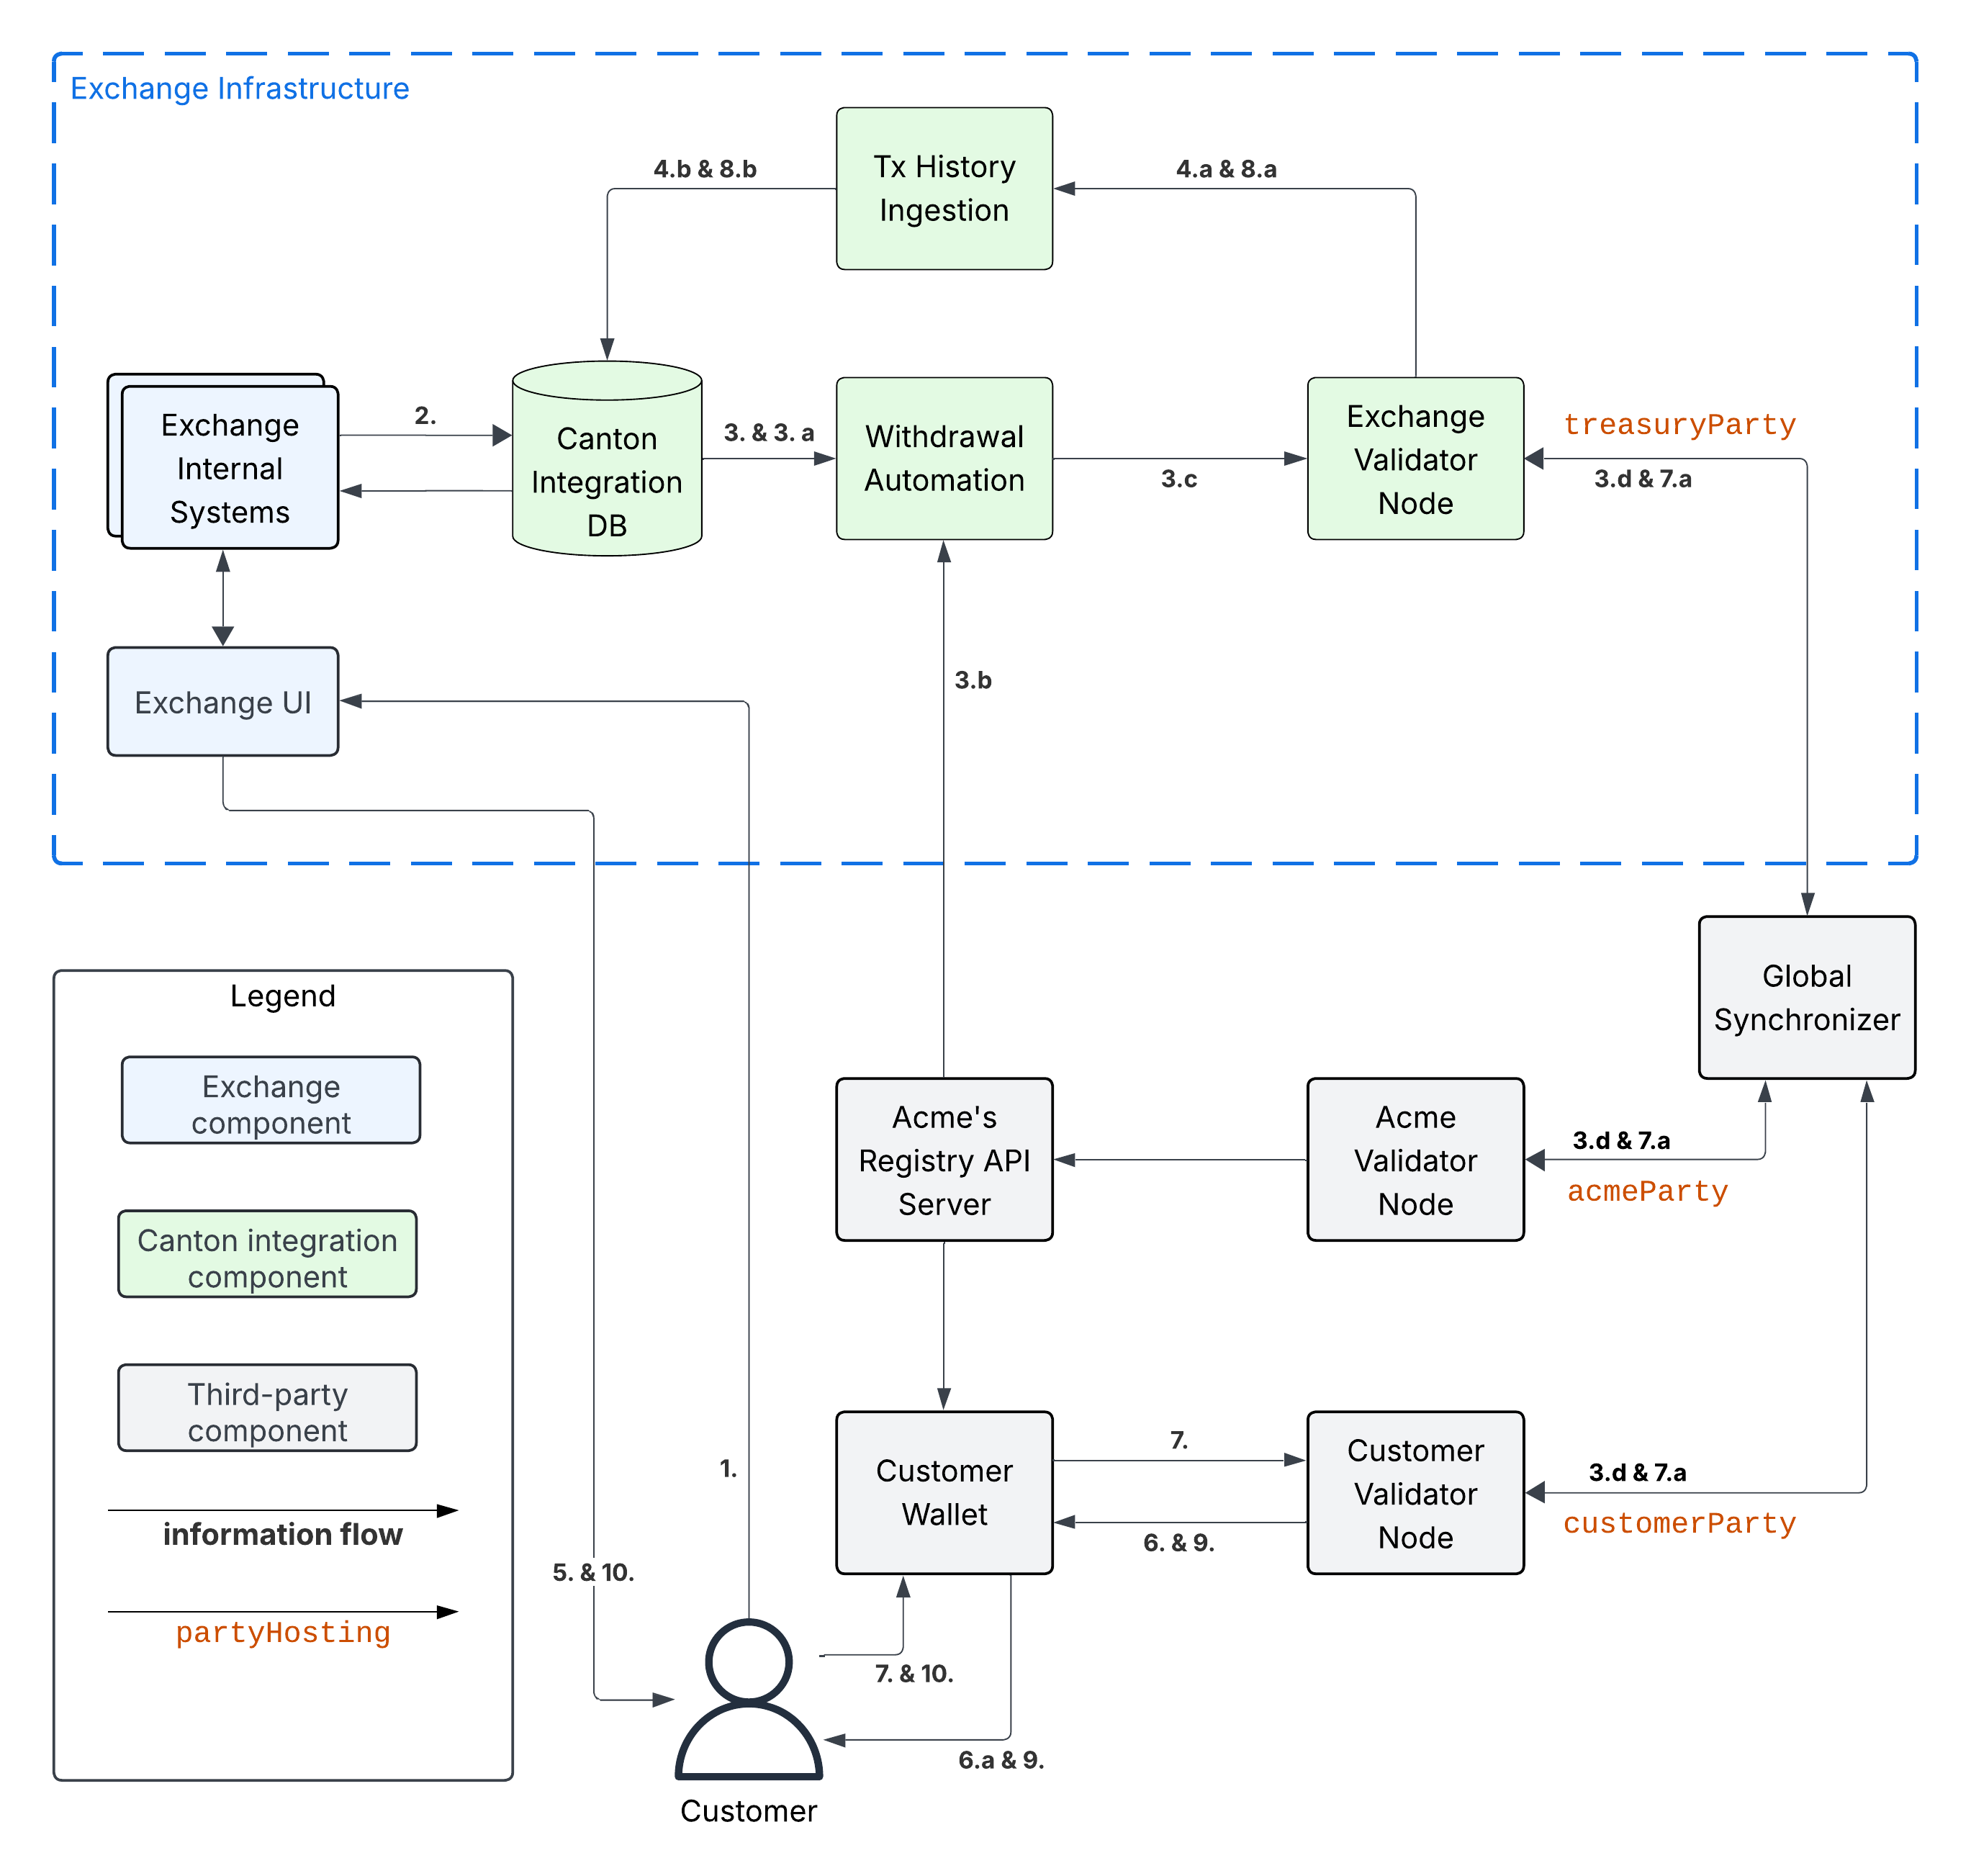
Example flow: withdrawal offer and acceptance
The flow uses essentially the same initial six steps as the 1-Step Withdrawal Workflow above. We list them in full for completeness.
Customer requests withdrawal of 100 AcmeToken to
customerPartyusing the Exchange UI.Exchange Internal Systems process that request and update the Canton Integration DB to store:
The deduction of 100 AcmeToken from the Customer’s trading account.
The pending withdrawal with id
wid123of 100 AcmeToken tocustomerParty.The AcmeToken
HoldingUTXOscoidsto use to fund the transfer tocustomerPartyforwid123. See UTXO Selection and Management for more information.The target record time
trecTgton the Global Synchronizer until which the transaction for the AcmeToken transfer must be committed using thecoidsUTXOs for fundingwid123. Thecoidsare considered to be reserved to funding this transfer untiltrecTgthas passed.
Withdrawal Automation queries the Canton Integration DB in a polling fashion, observes the pending withdrawal
wid123, and commits the corresponding AcmeToken transfer as follows.Withdrawal Automation retrieves the URL for Acme’s Registry API Server from the Canton Integration DB.
Withdrawal Automation queries Acme’s Registry API Server to retrieve the
TransferFactoryfor AcmeToken and extra transfer context.Withdrawal Automation prepares, signs, and submits the command to exercise the
TransferFactory_Transferchoice with the exclusive upper-bound for the record time of the commit set totrecTgt. It also sets the value for keysplice.lfdecentralizedtrust.org/reasonin theTransfermetadata towid123; and it sets the upper bound for the customer to accept the transfer far enough in the future, so that the customer has sufficient time to act (e.g. 1 year).The resulting transaction gets committed across the Customer, Exchange, and Acme validator nodes. It is assigned an update-id
upd567and a record timet1<trecTgtby the Global Synchronizer. It is assignedoff1by the Exchange Validator Node. It is assignedoff2by the Customer Validator Node. The resulting transaction has the following effects:It archives the AcmeToken
HoldingUTXOscoidsused to fund the transfer.It creates an AcmeToken
HoldingUTXO with contract-idcoid789owned bytreasuryPartyrepresenting the change returned to the Exchange.It creates one locked AcmeToken
HoldingUTXO with amount 100 and contract-idcoid345owned by thetreasuryParty.It creates a
TransferInstructionUTXO with contract-idcoid567representing the transfer offer. ThisTransferInstructionincludes a copy of theTransferspecification and its metadata.
Tx History Ingestion observes
upd567att1with offsetoff1and updates the Canton Integration DB as follows.Tx History Ingestion parses
upd567using the token standard tx history parser from the Wallet SDK to determine:The withdrawal-id
wid123from thesplice.lfdecentralizedtrust.org/reasonmetadata value.The new locked AcmeToken
HoldingUTXOcoid345owned by thetreasuryPartyand locked to the withdrawalwid123of 100 AcmeToken tocustomerParty.The new AcmeToken
HoldingUTXOcoid789owned by thetreasuryPartyThe
TransferInstructionUTXOcoid567representing the transfer offer for the withdrawal.
Tx History ingestion writes the following in a single, atomic transaction to the Canton Integration DB:
The latest ingested update-id
upd567, its record timet1and offsetoff1.The successful transfer offer for withdrawal
wid123by the transaction with update-idupd567at record timet1.The
HoldingUTXOcoid345locked to the withdrawal.The
TransferInstructionUTXOcoid567representing the transfer offer.The archival of the AcmeToken
HoldingUTXOscoids.The new AcmeToken
HoldingUTXOcoid789for the change returned after funding the AcmeToken transfer.
Exchange UI displays that withdrawal
wid123is pending transfer offer acceptance by the Customer.Customer Wallet observes update with update-id
upd567att1with offsetoff2on the Customer Validator Node.It parses the transaction using the token standard transaction history parser and updates its UI so that its transaction history shows the offer for a transfer of 100 AcmeToken from
exchangePartywith “Reason”wid123that was committed as updateupd567att1.
This is where the main difference to the 1-Step Withdrawal Workflow starts. The customer has a choice whether to accept or reject the transfer offer. Here they choose to accept it.
Customer uses their Customer Wallet to accept the offer using the
TransferInstruction_Acceptchoice.The resulting transaction is committed across Exchange, Acme, and Customer validator nodes and assigned update-id
upd789and record timet2. The transaction has the following effects:It archives the locked
HoldingUTXOcoid345.It archives the
TransferInstructionUTXOcoid567.It creates a 100 AcmeToken
HoldingUTXOcoid999owned by thecustomerParty.
Tx History Ingestion observes update
upd789att2and offsetoff3assigned by the Exchange Validator Node.It parses the update using the token standard parser to extract the withdrawal-id
wid123from thesplice.lfdecentralizedtrust.org/reasonmetadata value.Tx History Ingestion writes the following in a single, atomic transaction to the Canton Integration DB
The latest ingested update-id
upd789, its record timet2and offsetoff3.The successful completion of the withdrawal
wid123by the transaction with update-idupd789at record timet2.The archival of the locked AcmeToken
HoldingUTXOcoid345.
Customer Wallet observes
upd789att2and updates its display to reflect its effects.Customer observes the completion of the withdrawal at
t2in Exchange UI and confirms the receipt of funds in their Customer Wallet.
Example flow: customer rejects transfer offer
The Customer might decide to reject the offer in Step 7 in the example above. The corresponding transaction will
archive the locked
HoldingUTXOcoid345,archive the
TransferInstructionUTXOcoid567, andcreate a new 100 AcmeToken
HoldingUTXOcoid999owned by thetreasuryParty.
Steps 8 - 10 are largely the same as for the successful acceptance with the difference that Tx History Ingestion will see this transaction and update the Canton Integration DB to such that
withdrawal
wid123is marked as failed because the customer rejected the offer, andthe customer account is credited back the 100 AcmeToken, potentially minus a fee for the failed withdrawal.
And the user will ultimately see in both the Exchange UI and the Customer Wallet that the transfer was offered, but rejected by them.
Note
In most cases a TransferInstruction will be completed in a single extra step:
the receiver either accepts or rejects the transfer, or the sender withdraws it.
Each of these steps will manifest as one of the choices on the TransferInstruction interface
(code)
and its TransferInstructionResult.output value clearly tells whether the instruction
completed with a successful transfer, failed, or is still pending an action by one of the stakeholders.
Canton Network Token Onboarding
You likely have requirements and considerations for onboarding a token. In the following, we document the additional considerations that are specific to Canton.
At a high-level, the Canton-specific steps to onboarding a token are:
Upload the token admin’s .dar files to your validator node.
Store the mapping from the token admin’s
adminPartyid to the admin’s Registry API Server URL in your Canton Integration DB (or another suitable place).In case the token is permissioned, follow the token admin’s instructions to have your exchange’s
treasuryPartyadded to the token’s allowlist.
Make sure that you only upload .dar files from trusted token admins to avoid unwanted changes to the behavior of your existing contracts on-ledger.
Many token admin’s run a test instance of their token on TestNet. Consider using these test instances as part of your testing strategy.
For example, Canton Coin also exist on TestNet and DevNet
with different dsoParty ids.
You can retrieve the dsoParty id for each network using the
CC Scan API
served from the SV nodes of that network:
Use /v0/dso to query the
dsoPartyfor the network you are connected to.Use /v0/splice-instance-names to query the network name (DevNet, TestNet, or MainNet).