- Overview
- Tutorials
- Getting started
- Get started with Canton and the JSON Ledger API
- Get Started with Canton, the JSON Ledger API, and TypeScript
- Get started with Canton Network App Dev Quickstart
- Using the JSON Ledger API
- Get started with smart contract development
- Basic contracts
- Test templates using Daml scripts
- Build the Daml Archive (.dar) file
- Data types
- Transform contracts using choices
- Add constraints to a contract
- Parties and authority
- Compose choices
- Handle exceptions
- Work with dependencies
- Functional programming 101
- The Daml standard library
- Test Daml contracts
- Next steps
- Application development
- Getting started
- Development how-tos
- Component how-tos
- Explanations
- References
- Application development
- Smart contract development
- Daml language cheat sheet
- Daml language reference
- Daml standard library
- DA.Action.State.Class
- DA.Action.State
- DA.Action
- DA.Assert
- DA.Bifunctor
- DA.Crypto.Text
- DA.Date
- DA.Either
- DA.Exception
- DA.Fail
- DA.Foldable
- DA.Functor
- DA.Internal.Interface.AnyView.Types
- DA.Internal.Interface.AnyView
- DA.List.BuiltinOrder
- DA.List.Total
- DA.List
- DA.Logic
- DA.Map
- DA.Math
- DA.Monoid
- DA.NonEmpty.Types
- DA.NonEmpty
- DA.Numeric
- DA.Optional
- DA.Record
- DA.Semigroup
- DA.Set
- DA.Stack
- DA.Text
- DA.TextMap
- DA.Time
- DA.Traversable
- DA.Tuple
- DA.Validation
- GHC.Show.Text
- GHC.Tuple.Check
- Prelude
- Smart contract upgrading reference
- Glossary of concepts
Explore the Canton Network Application Quickstart demo
Business case
The Canton Network (CN) Quickstart is scaffolding to support development efforts to build, test, and deploy CN applications. It resolves infrastructure problems that every CN application must solve. Use the CN Quickstart Application so you and your team can focus on building your application, instead of build systems, deployment configurations, and testing infrastructure.
Core business operations
The Quickstart features a sample licensing app to demonstrate Canton development patterns. In the app, providers sell time-based access to their services. Users pay with Canton Coin (CC) and manage payments through a Canton Wallet.
The app involves four parties:
The Application Provider who sells licenses.
The Application User who buys licenses.
The underlying Amulet token system that handles payments, using CC.
The DSO Party, the Decentralized Synchronizer Operations Party who operates the Amulet payment system. In CN, this is the Super Validators.
The application issues licenses using the following process:
Issuing a license
The provider creates a new license for an onboarded user. The license starts expired and needs to be renewed before use.
Requesting a license renewal
The provider creates a renewal request, generating a payment request for the user. A matching CC payment request is created on the ledger.
Paying for a license renewal
The user approves the payment through their Canton Wallet, which creates an accepted payment contract on the ledger.
Renewing the license
The provider processes the accepted payment and updates the license with a new expiration date.
Overview
This How-to helps you become familiar with a Canton Network (CN) business operation within the CN App Quickstart. The App Quickstart application is intended to be extended by your team to meet your business needs. When you are familiar with the App Quickstart, review the technology choices and application design to determine what changes are needed. Technology and design decisions are ultimately up to you.
If you find errors, please contact your representative at Digital Asset.
Prerequisites
Install the CN App Quickstart before beginning this demonstration.
Walkthrough
The CN App Quickstart can run with or without authorization, based on your business needs.
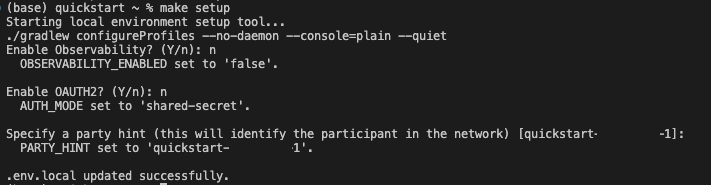
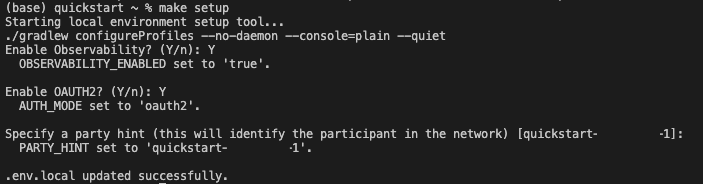
Toggle authorization with the make setup command in the quickstart subdirectory.
make setup asks to enable Observability, OAUTH2, and specify a party hint.
In this demo, we disable TEST MODE, use the default party hint, and show OAUTH2 as enabled and disabled.
When OAUTH2 makes a difference, we display both paths, one after the other.
You can follow your path and ignore the other.
You may enable Observability, but it is not required for this demo.
Choose your adventure:
make setup without OAUTH2:
make setup with OAUTH2:
Build Quickstart
Build and start App Quickstart:
make build; make start
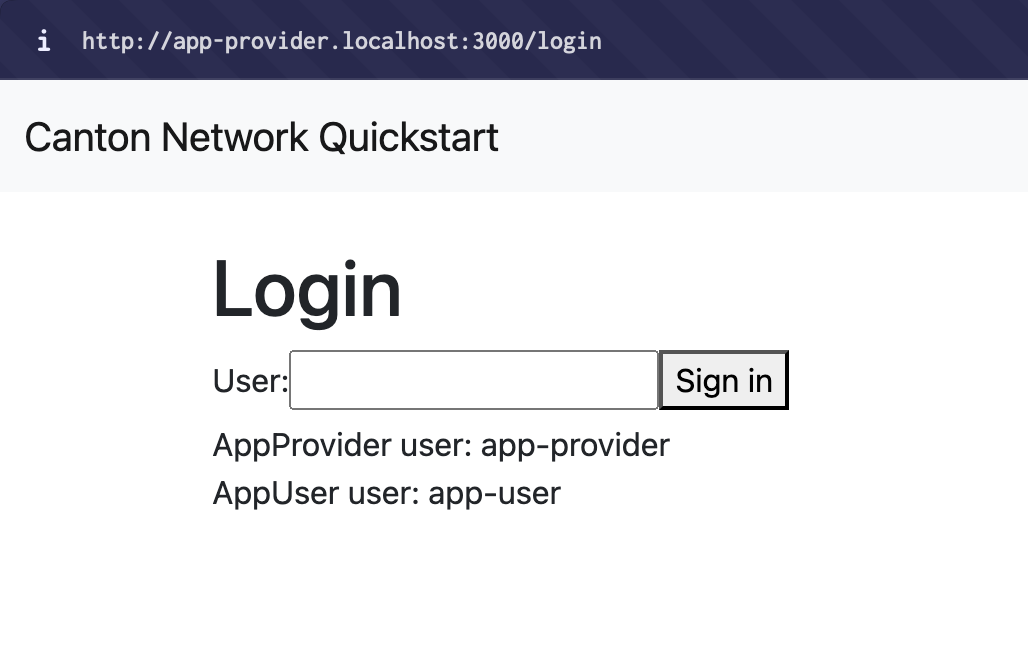
Open an incognito browser and navigate to:
app-provider.localhost:3000
Alternatively, in the terminal, from quickstart/ run:
``make open-app-ui``
Note
Safari users may need to manually map the app-provider subdomain in /etc/hosts.
Use the terminal command sudo nano /etc/hosts to add:
127.0.0.1 app-provider.localhost
This tells your system to resolve app-provider.localhost to your local machine.
Then save and close the file.
Restart Safari.
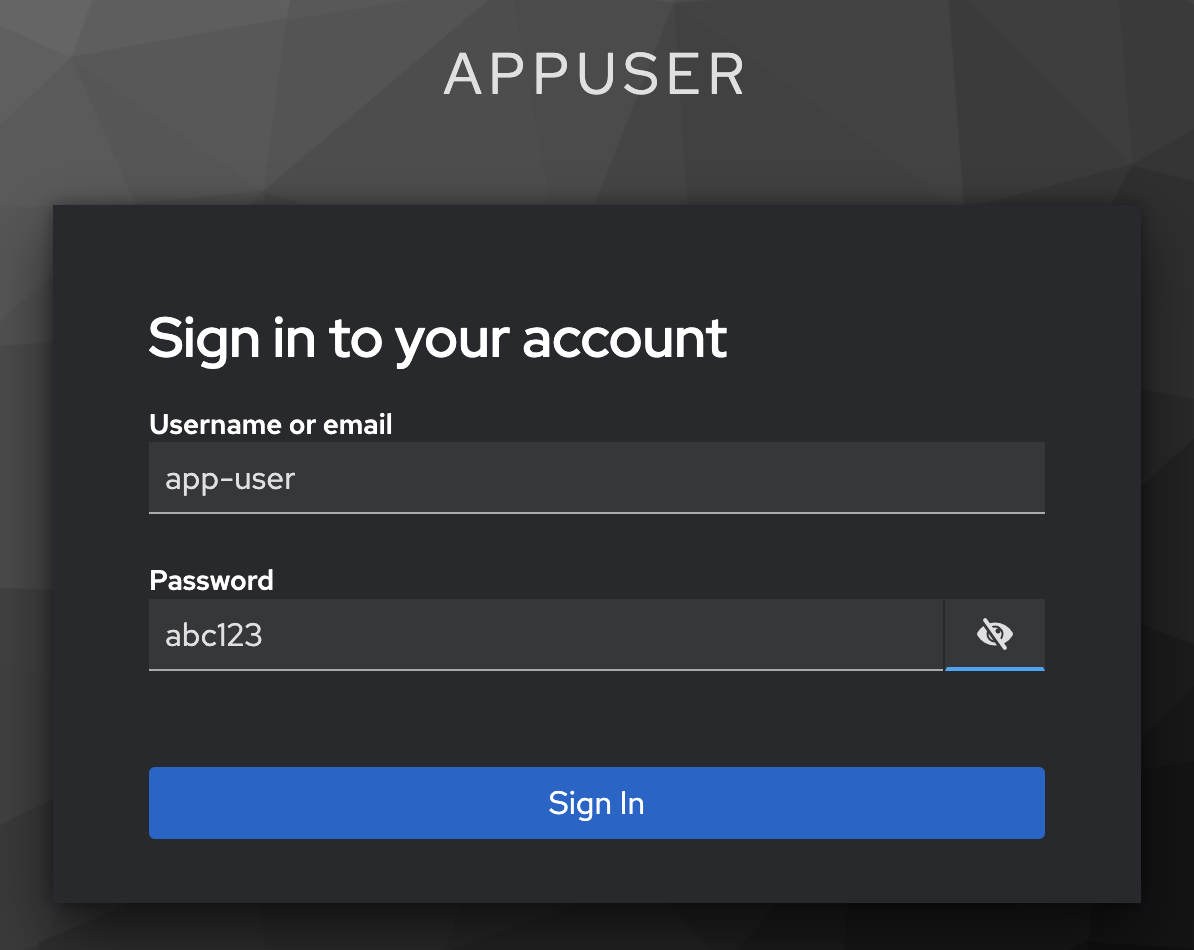
Login
OAUTH2 disabled
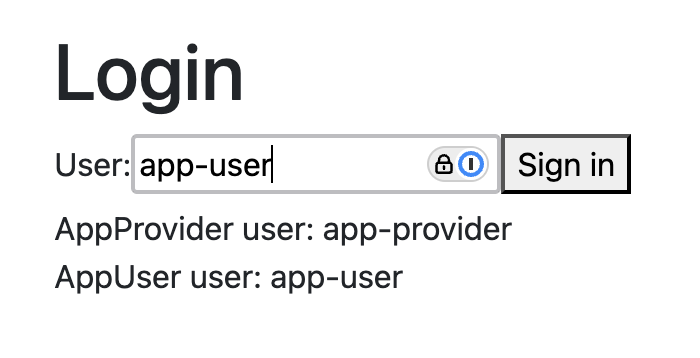
When OAUTH2 is disabled, the homepage presents a simple login field.
Begin by logging in as the AppProvider by entering “app-provider” in the User field.
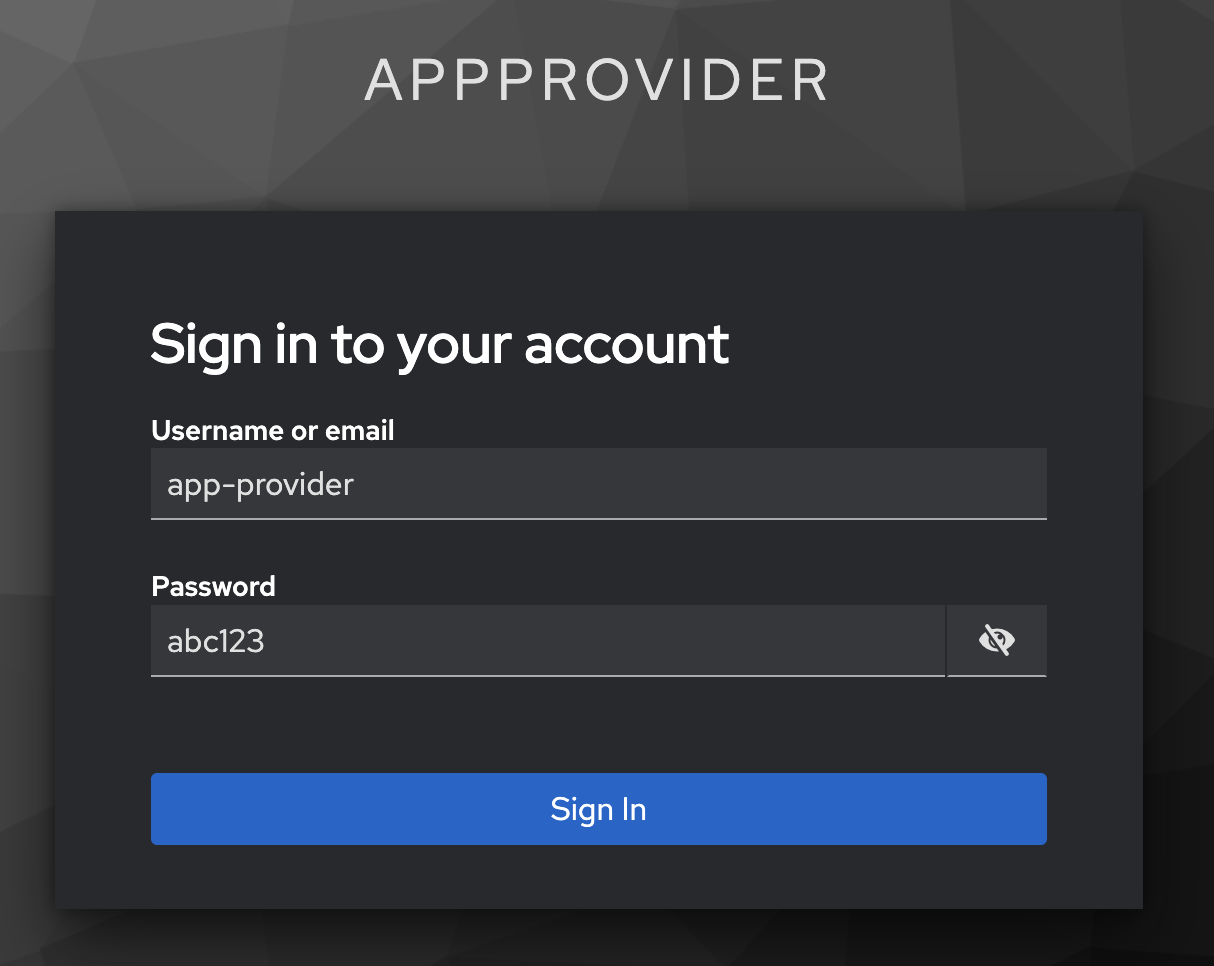
OAUTH2 enabled
When OAUTH2 is enabled, the homepage prompts to login with Keycloak’s OAuth 2.0 portal:

Make a mental note that AppProvider’s username is “app-provider” and the password is “abc123” (all lowercase).
Login with app-provider with keycloak.
Fill in the login credentials: username: app-provider, password: abc123
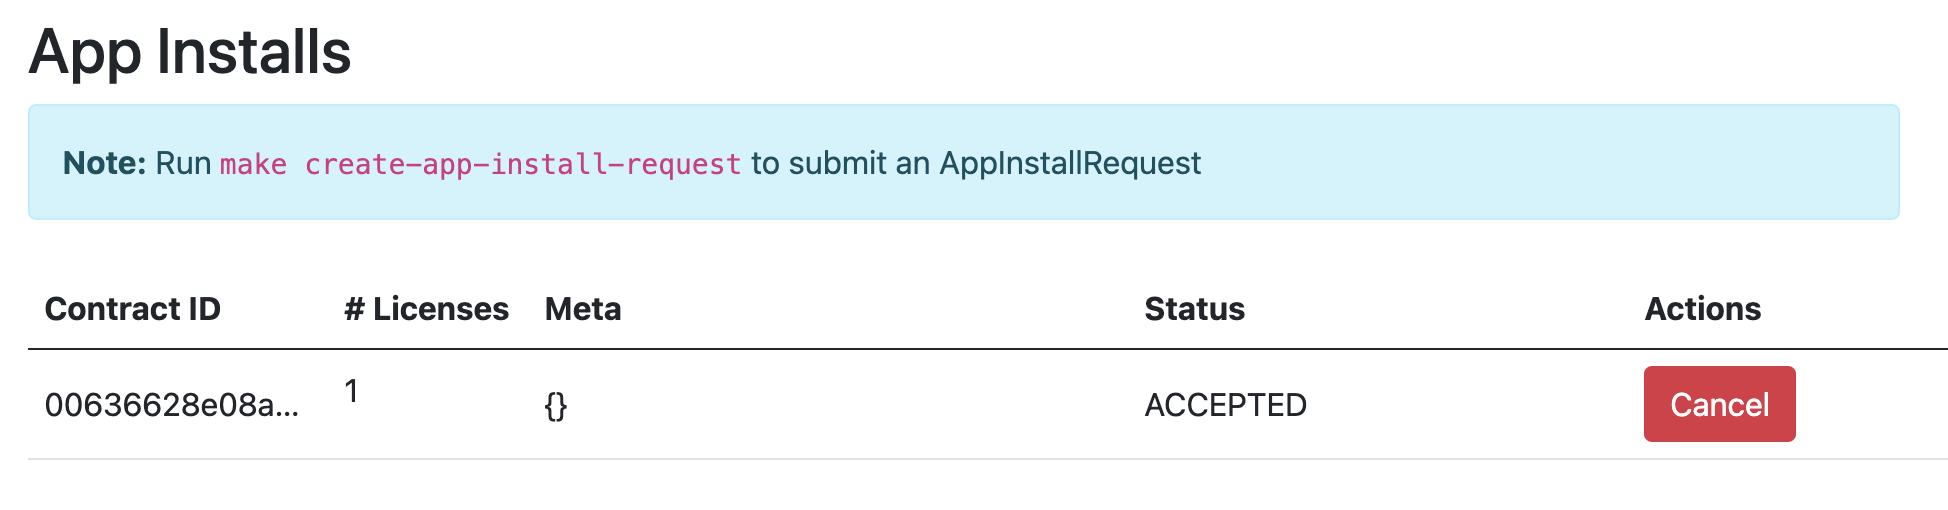
The App Installs Menu
Once you are logged in select AppInstalls in the menu.
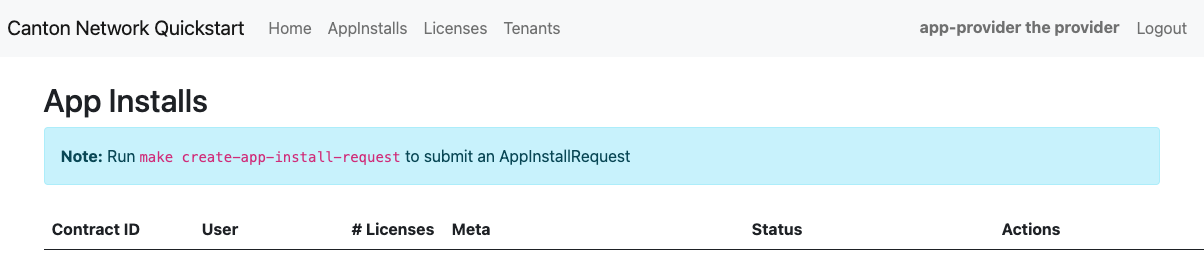
Open a terminal to create an app install request.
From /quickstart/ run:
make create-app-install-request
This command creates an App Installation Request on behalf of the Participant.

Note
If your machine is not powerful enough to host LocalNet or if the docker containers are not responsive then the response may show a failure with status code 404 or 000 (as shown in the image below). Increasing Docker memory limit to at least 8 GB should allow the LocalNet containers to operate properly.
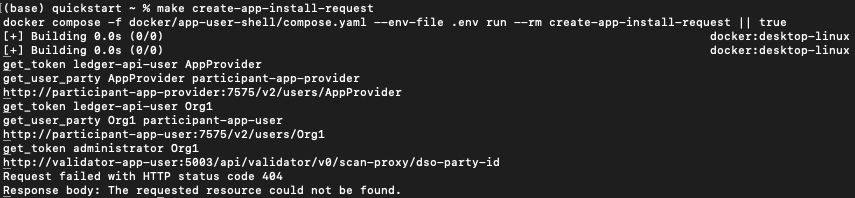
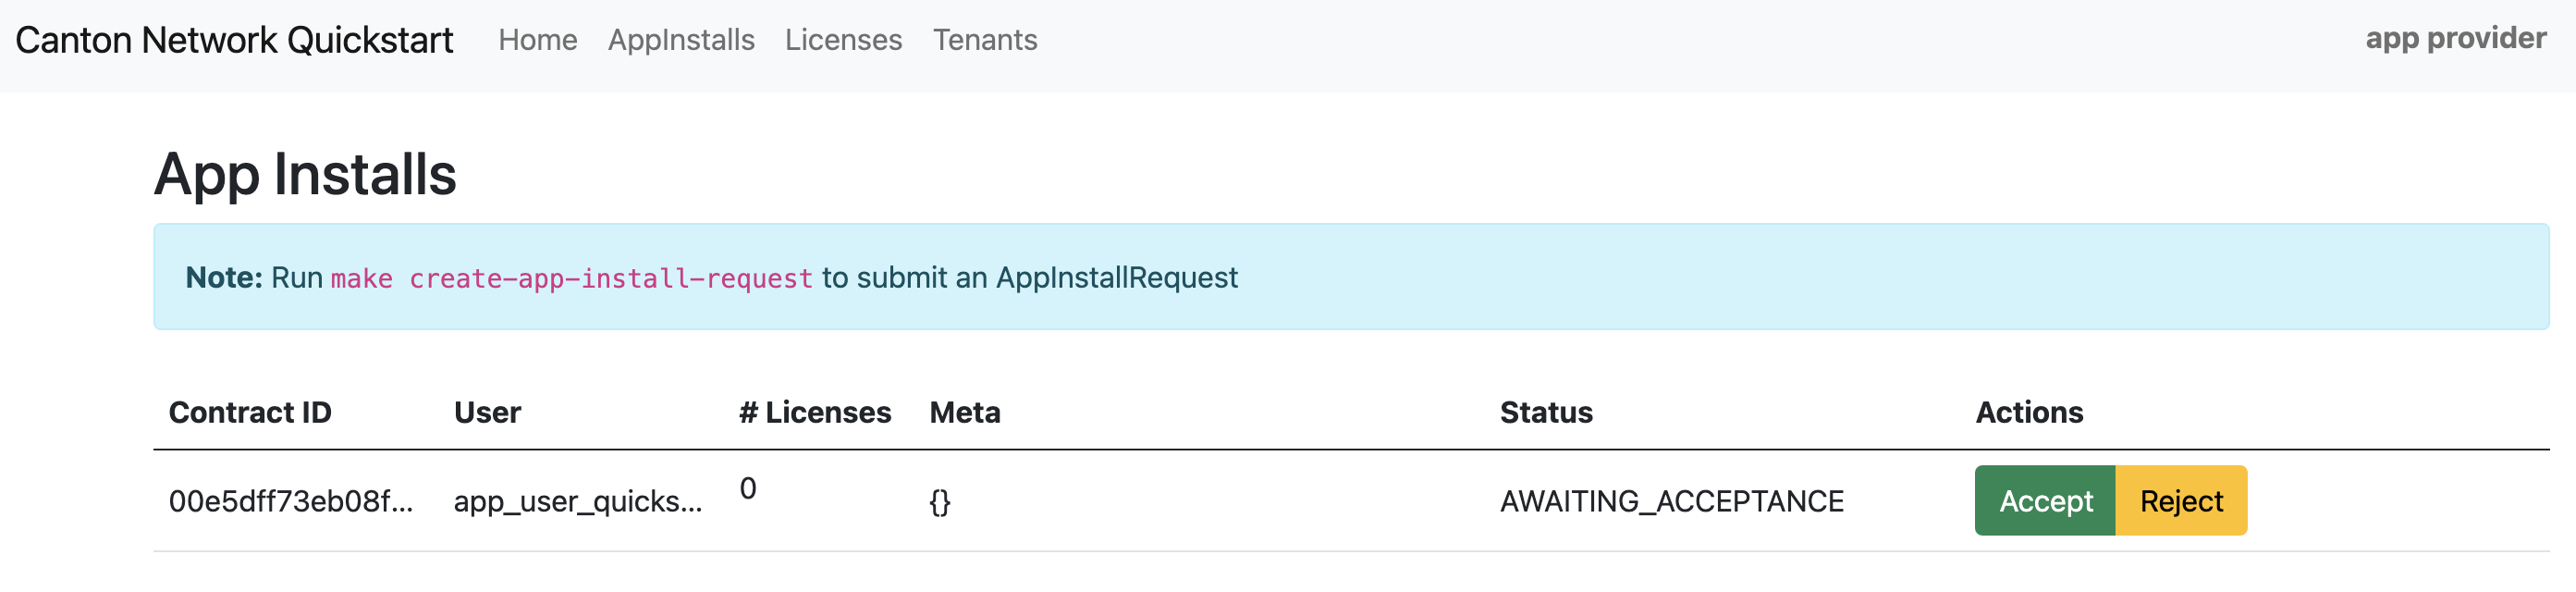
Return to the browser.
AppInstallRequest
The install request appears in the list.
Click Accept.
The AppInstallRequest is Accepted.
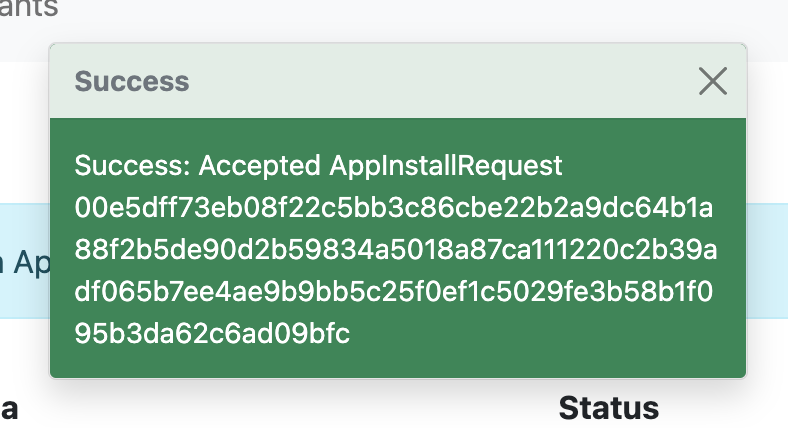
The actions update to Cancel and Create license.
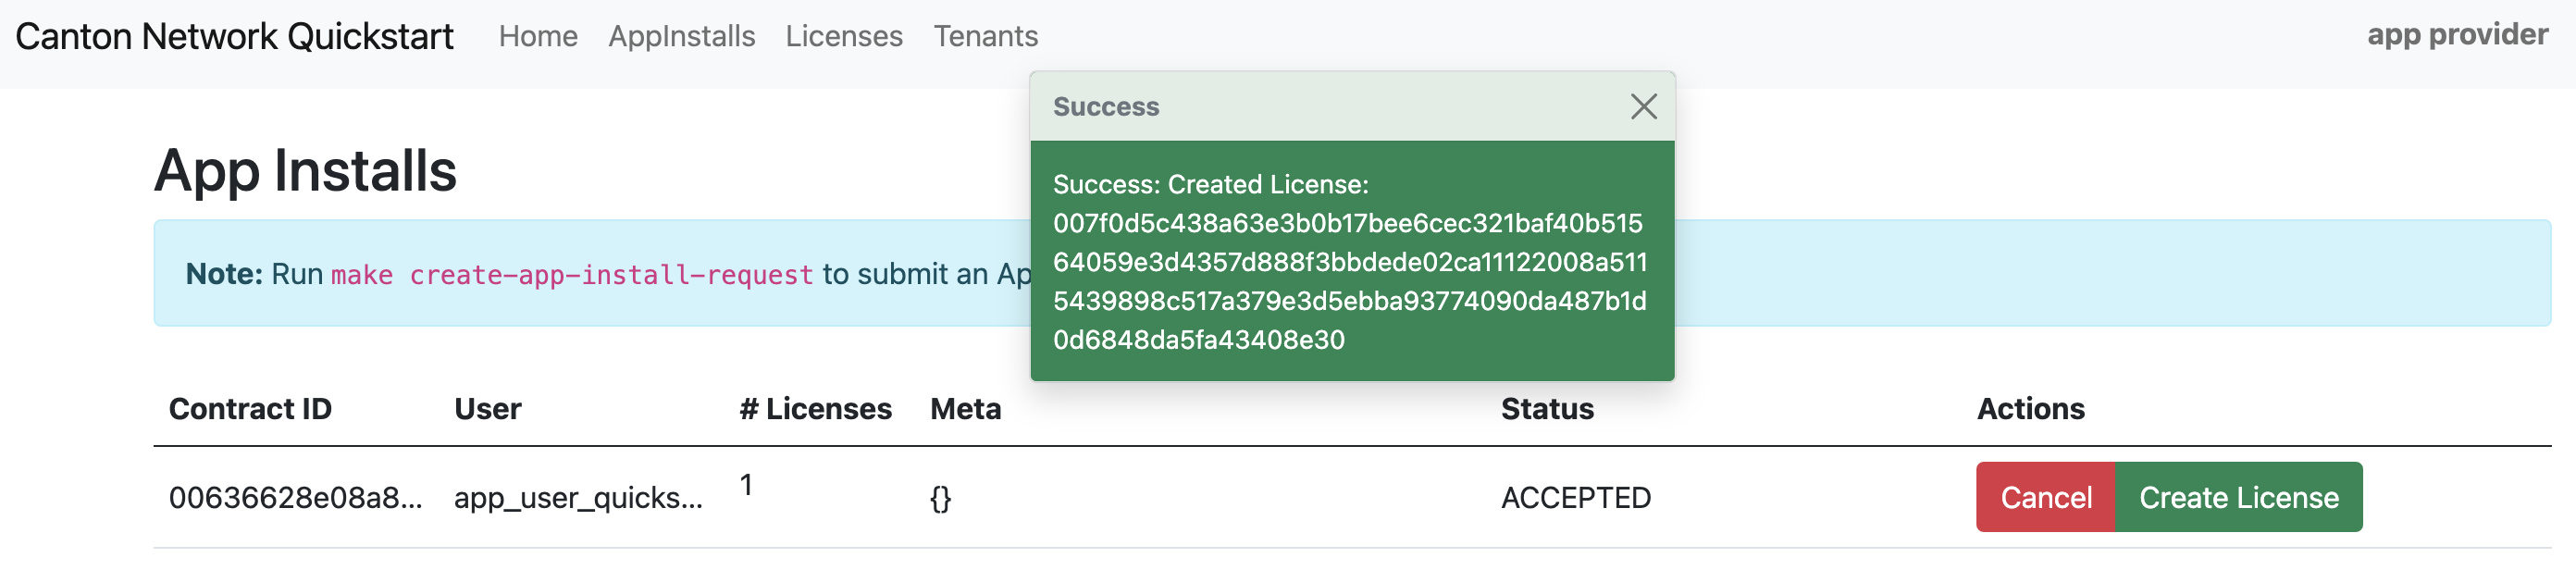
Create a license
Click Create License. The license is created and the “# Licenses” field is updated.
Next, navigate to the Licenses menu and select Renewals.

A “License Renewal Request” modal opens with an option to renew a license.
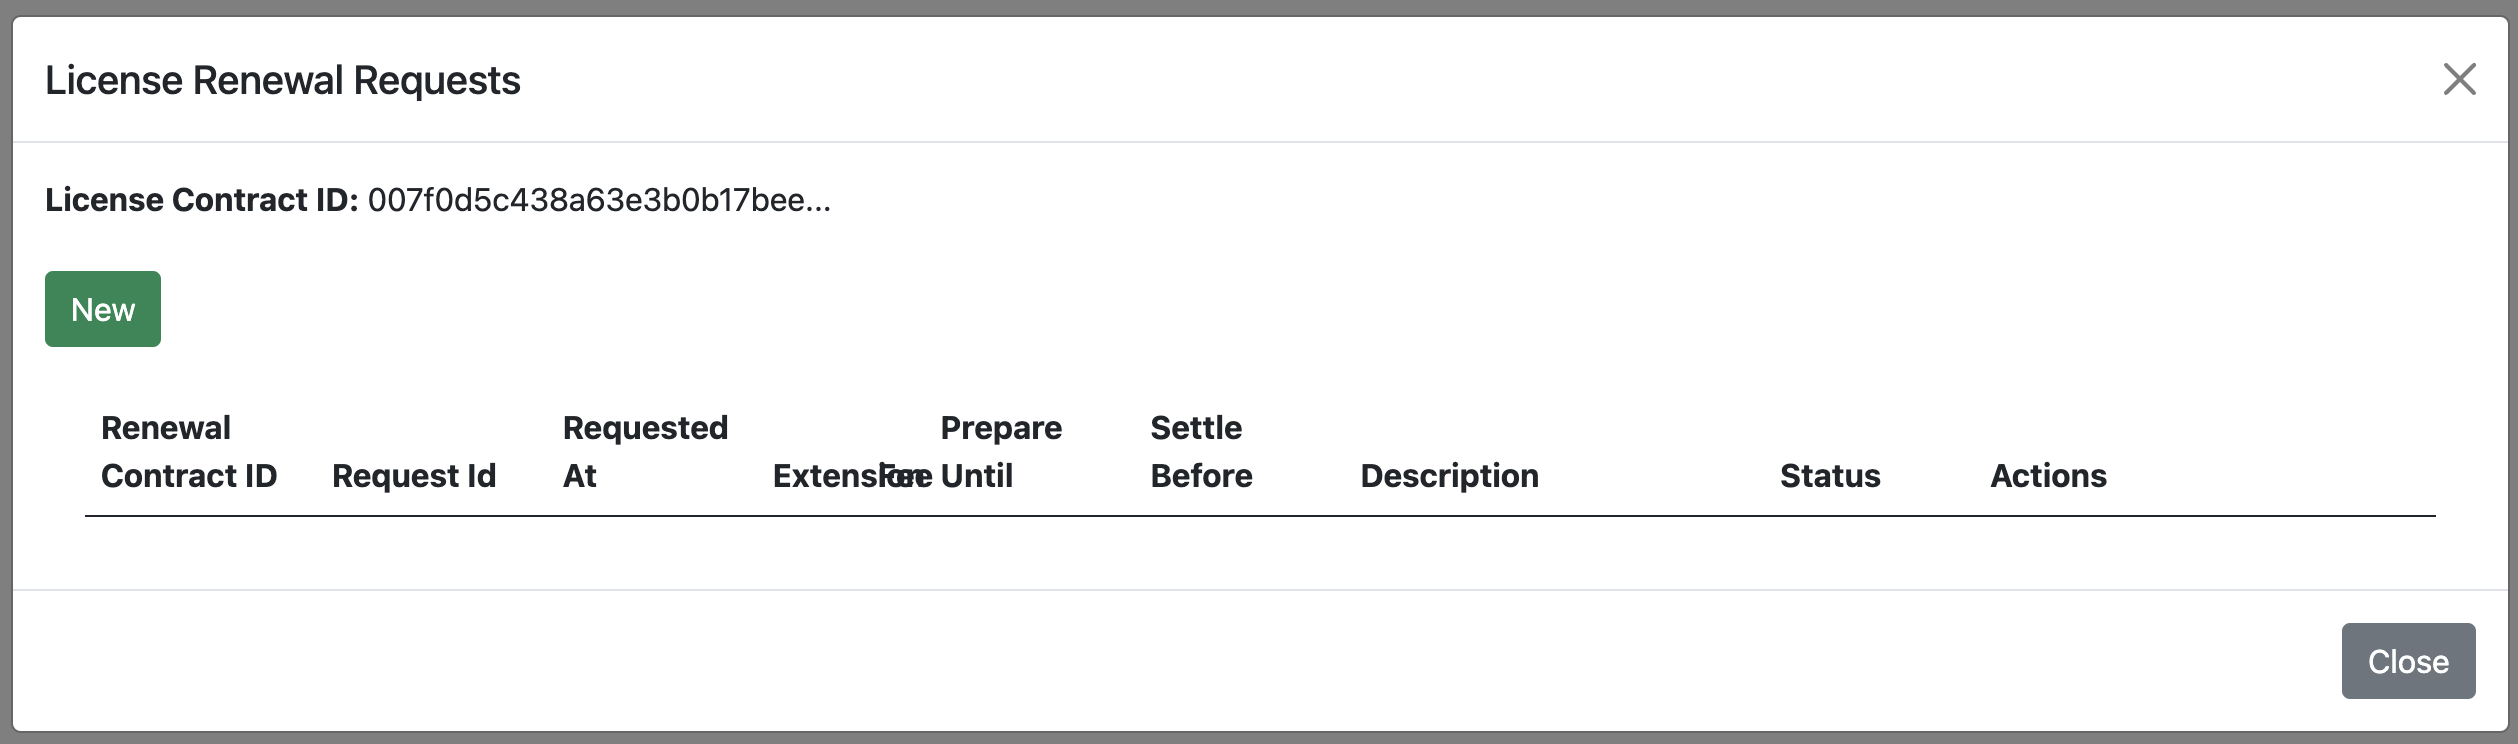
Click New to open the “Renew License” modal.
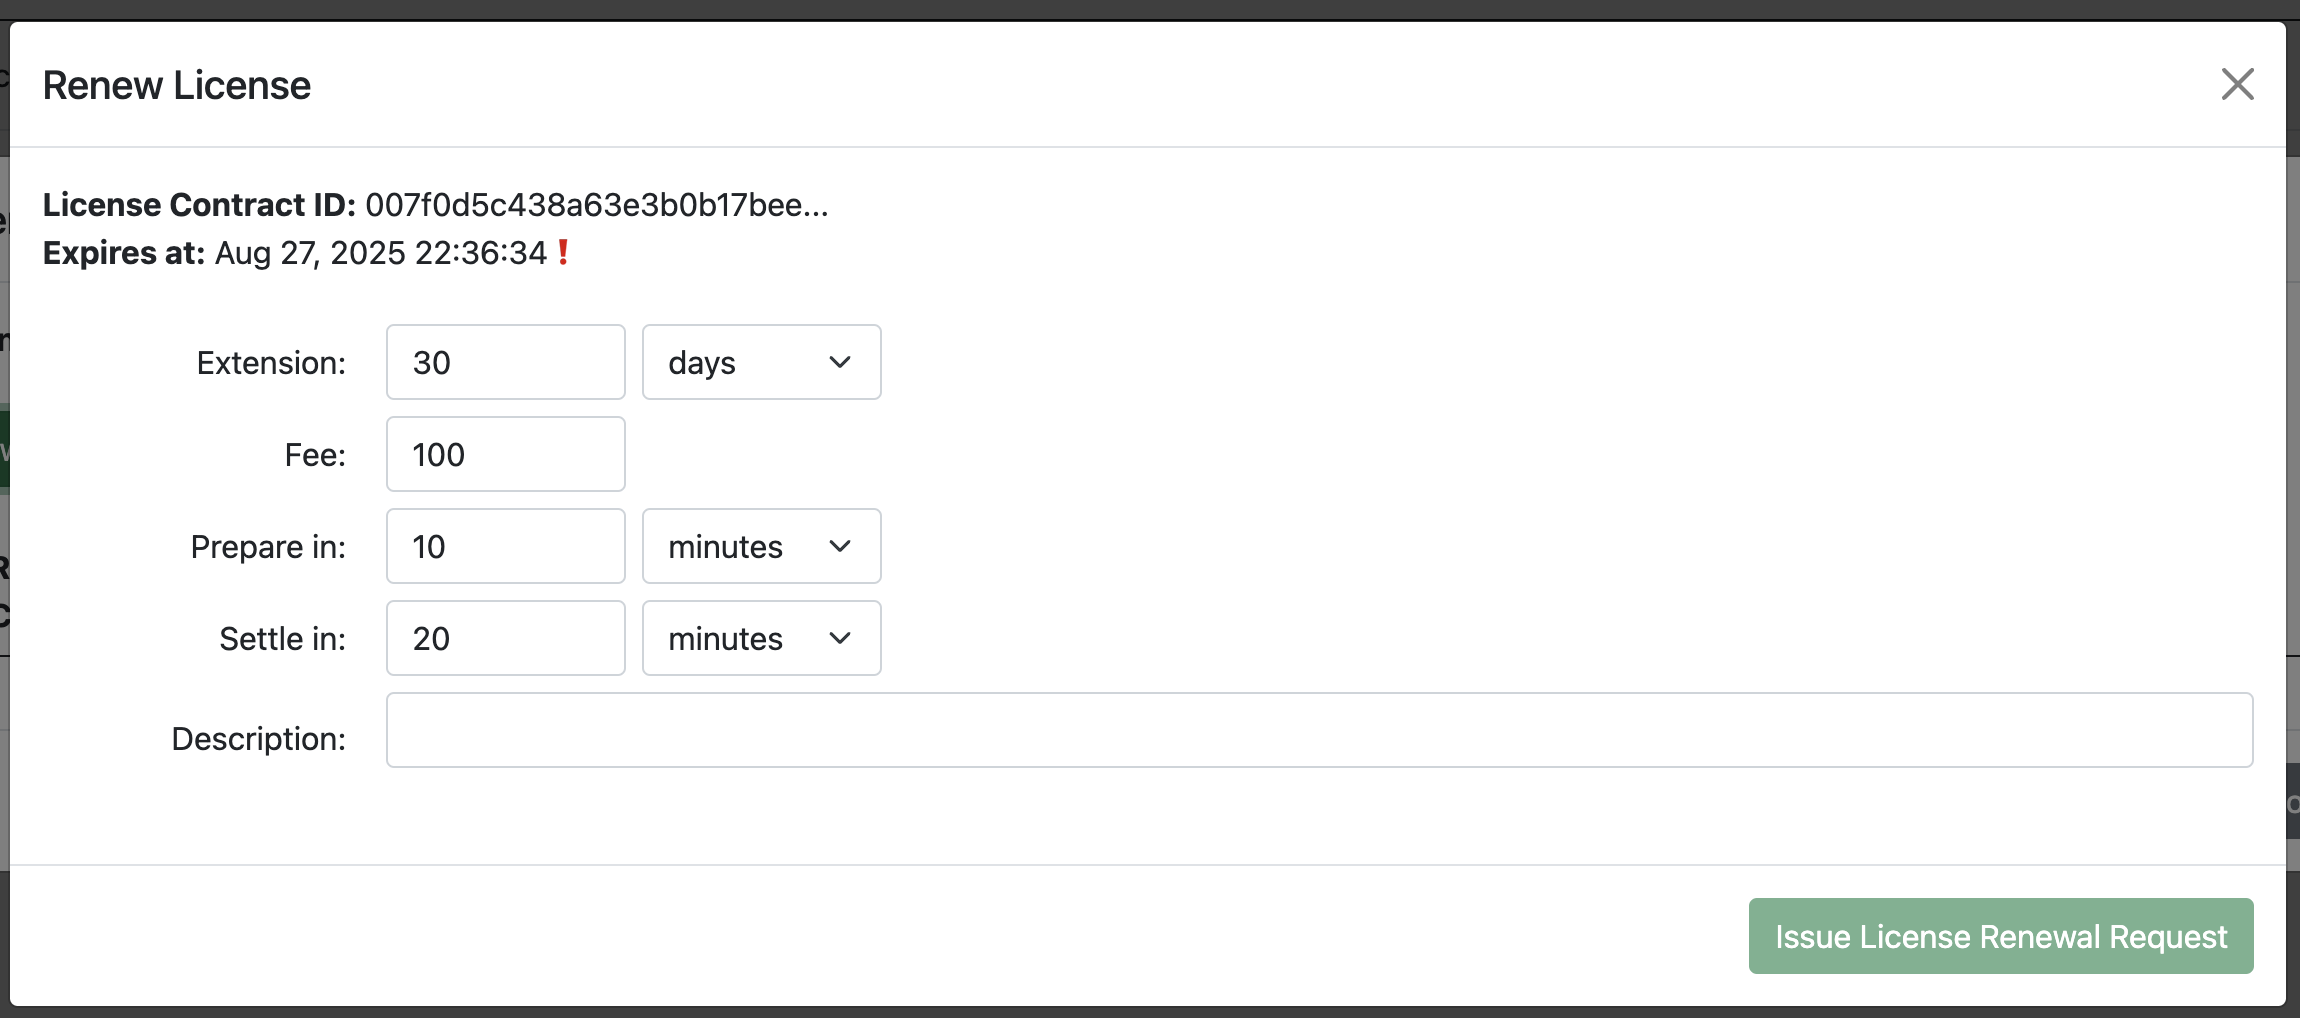
In the modal, set the number of days to renew the license, the fee, time to prepare the license, and time to settle the license. You must add a description to proceed.
“Prepare in” is an indication for the sender (app-user) that they are expected to accept allocation before that time.
“Settle in” is a time that the provider has to completeRenewal.
After that, the allocation will be expired.
Click Issue License Renewal Request.
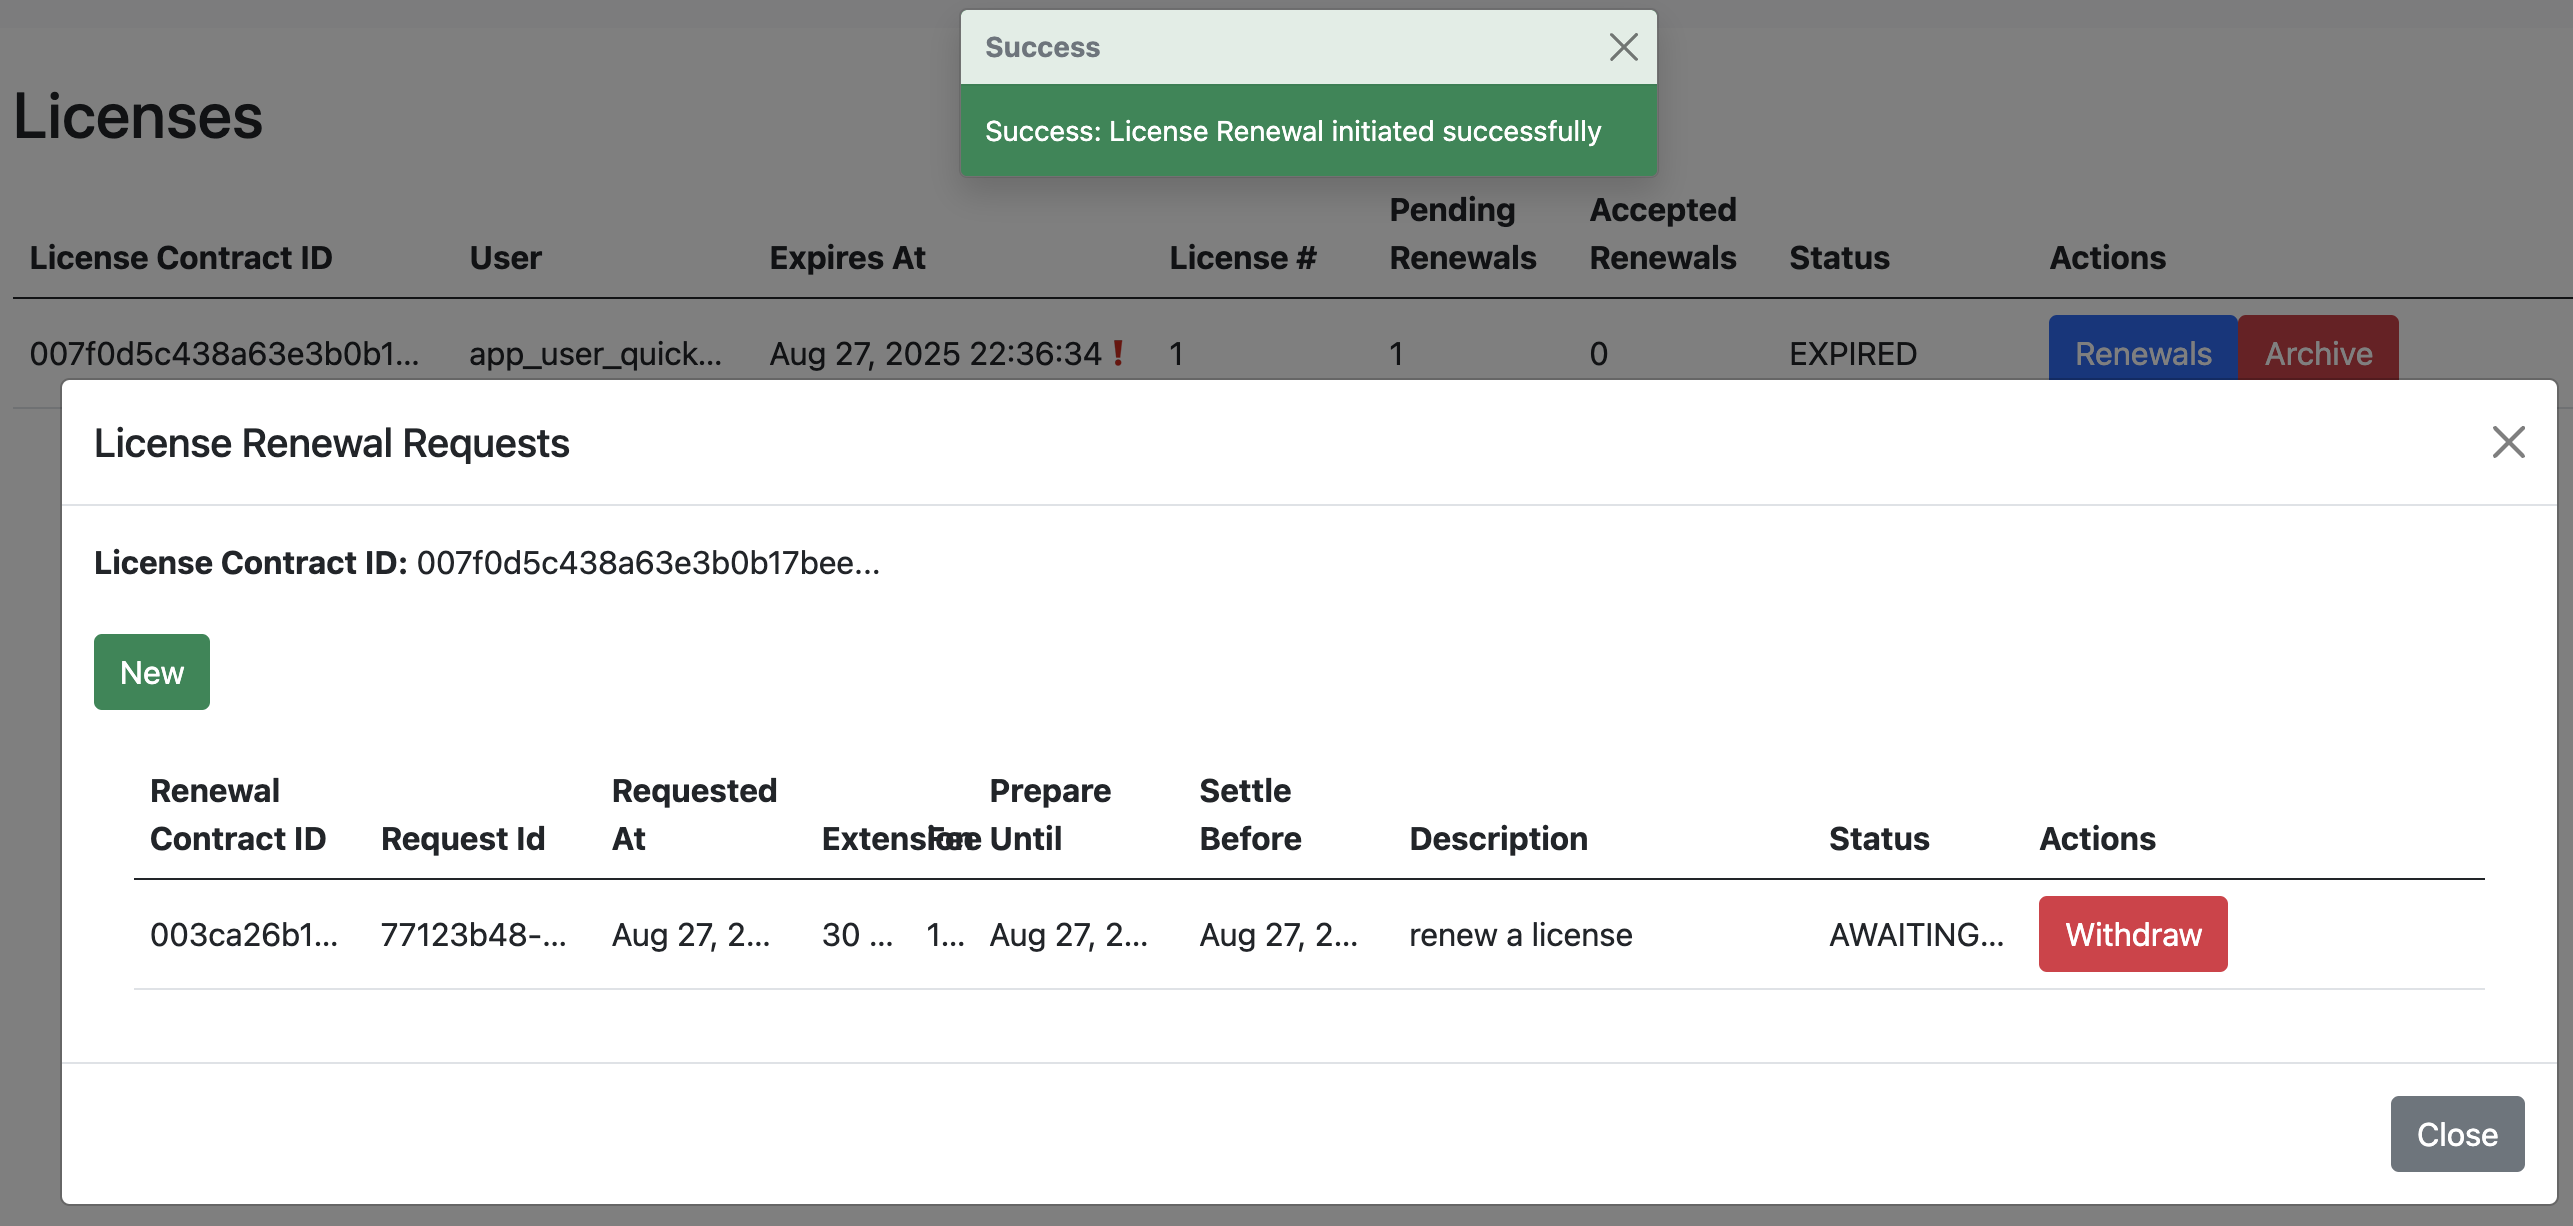
Per the Daml contract, licenses are created in an expired state. To activate the license, a renewal payment request must be issued.
Make a payment
To make payment, navigate to the Canton Wallet at http://wallet.localhost:2000/allocations and log in as app-user if prompted.
You can find the wallet’s location by:
Reading the Splice Local Network docs.
Navigating to the App Provider’s “Tenants” menu.
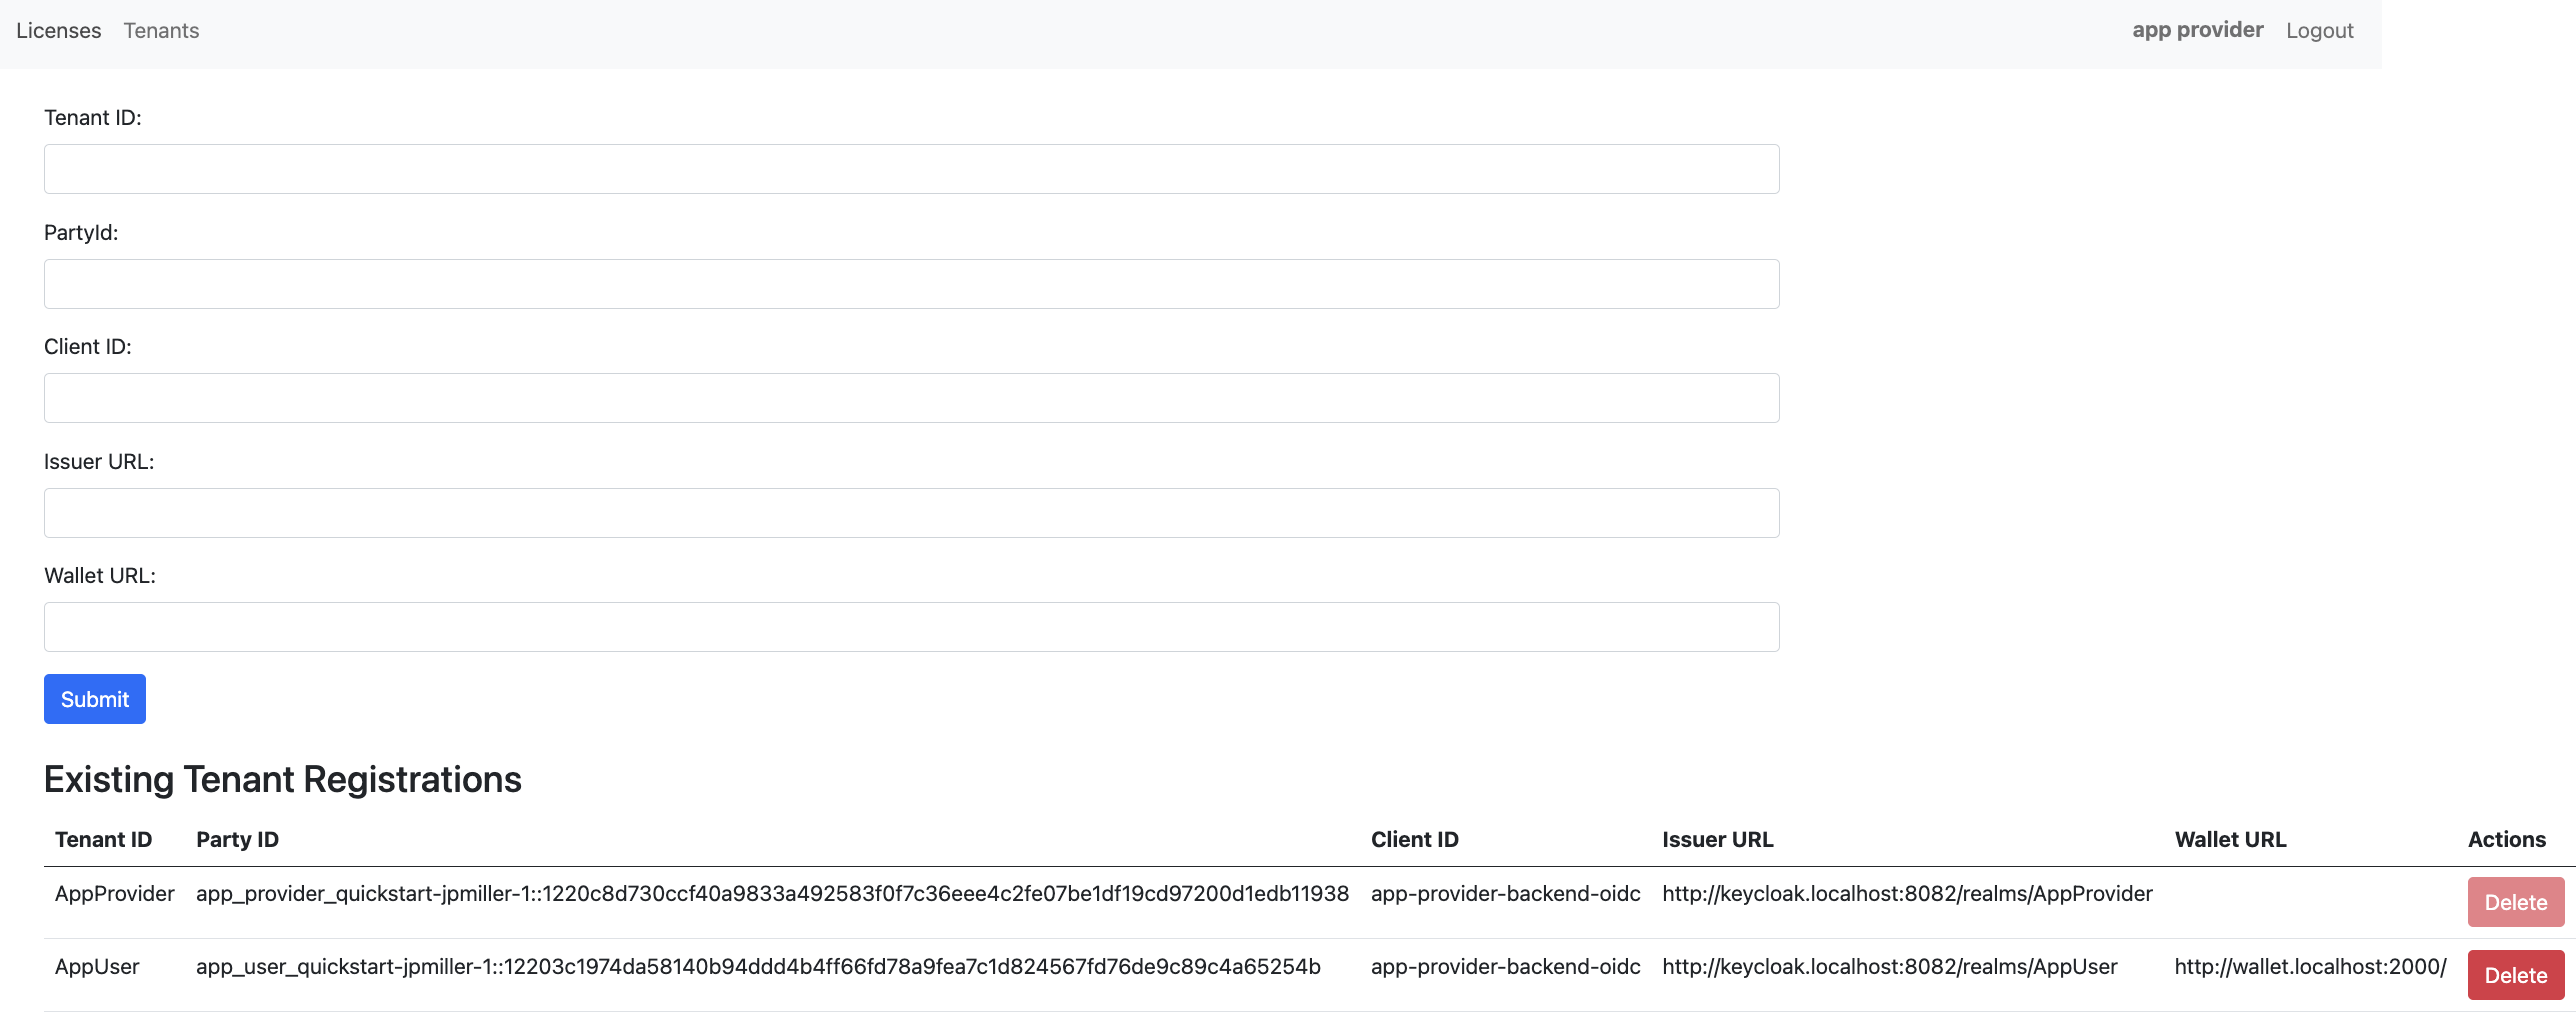
Logging into the app as
app-user, navigating to the Licenses menu, then clicking the Renewals action.

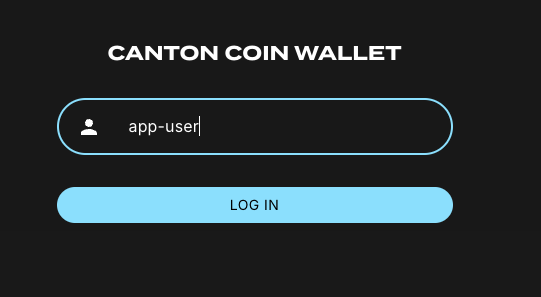
If prompted, log in to the CC Wallet as app-user.
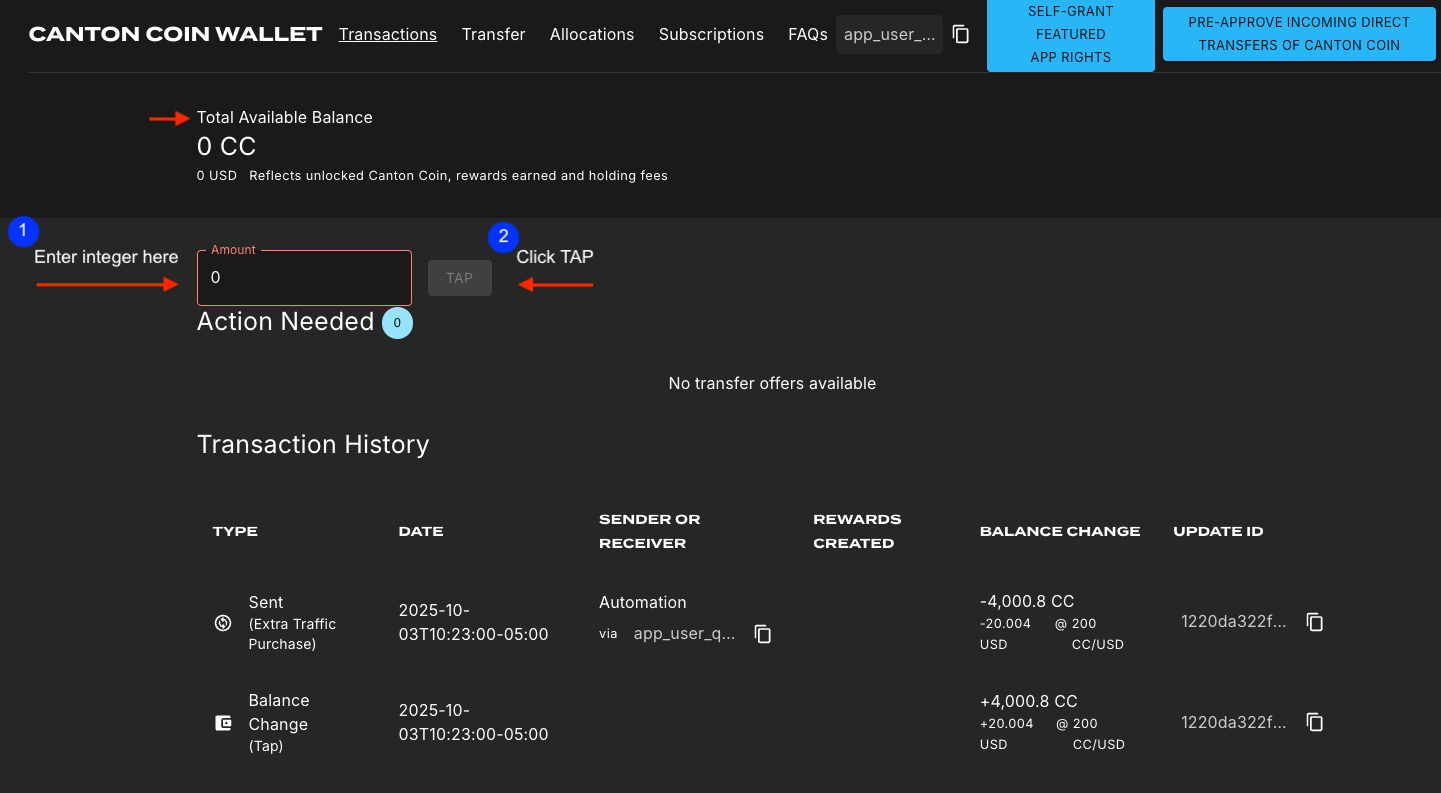
If your wallet does not have CC then enter an amount and click TAP. After a moment, the available balance will automatically update.
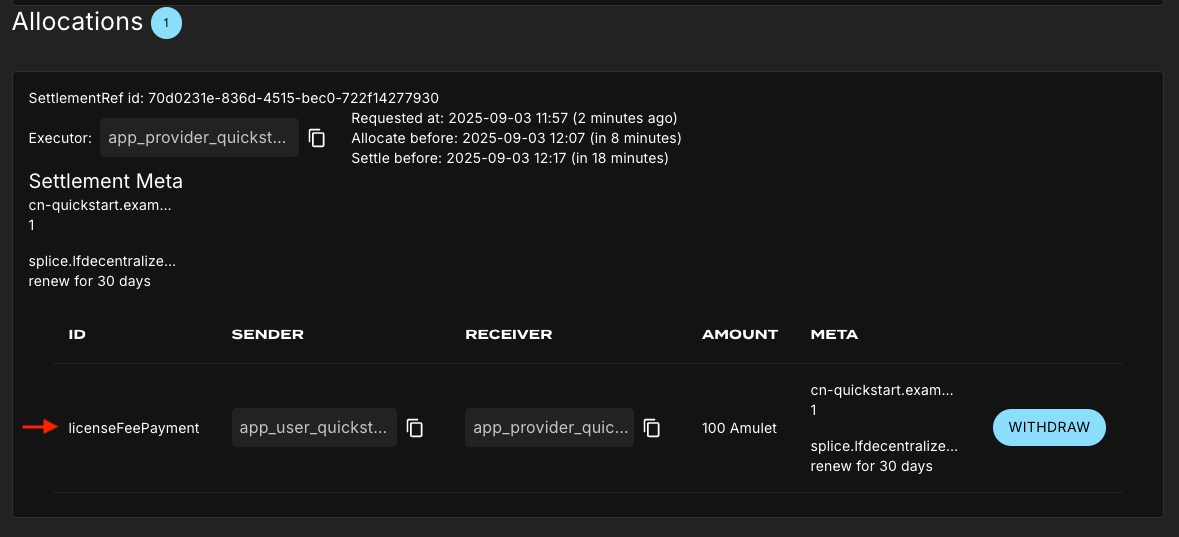
Once your CC wallet is loaded, navigate to the “Allocations” menu and accept the “Allocation Request” before the “Allocate before” time expires.
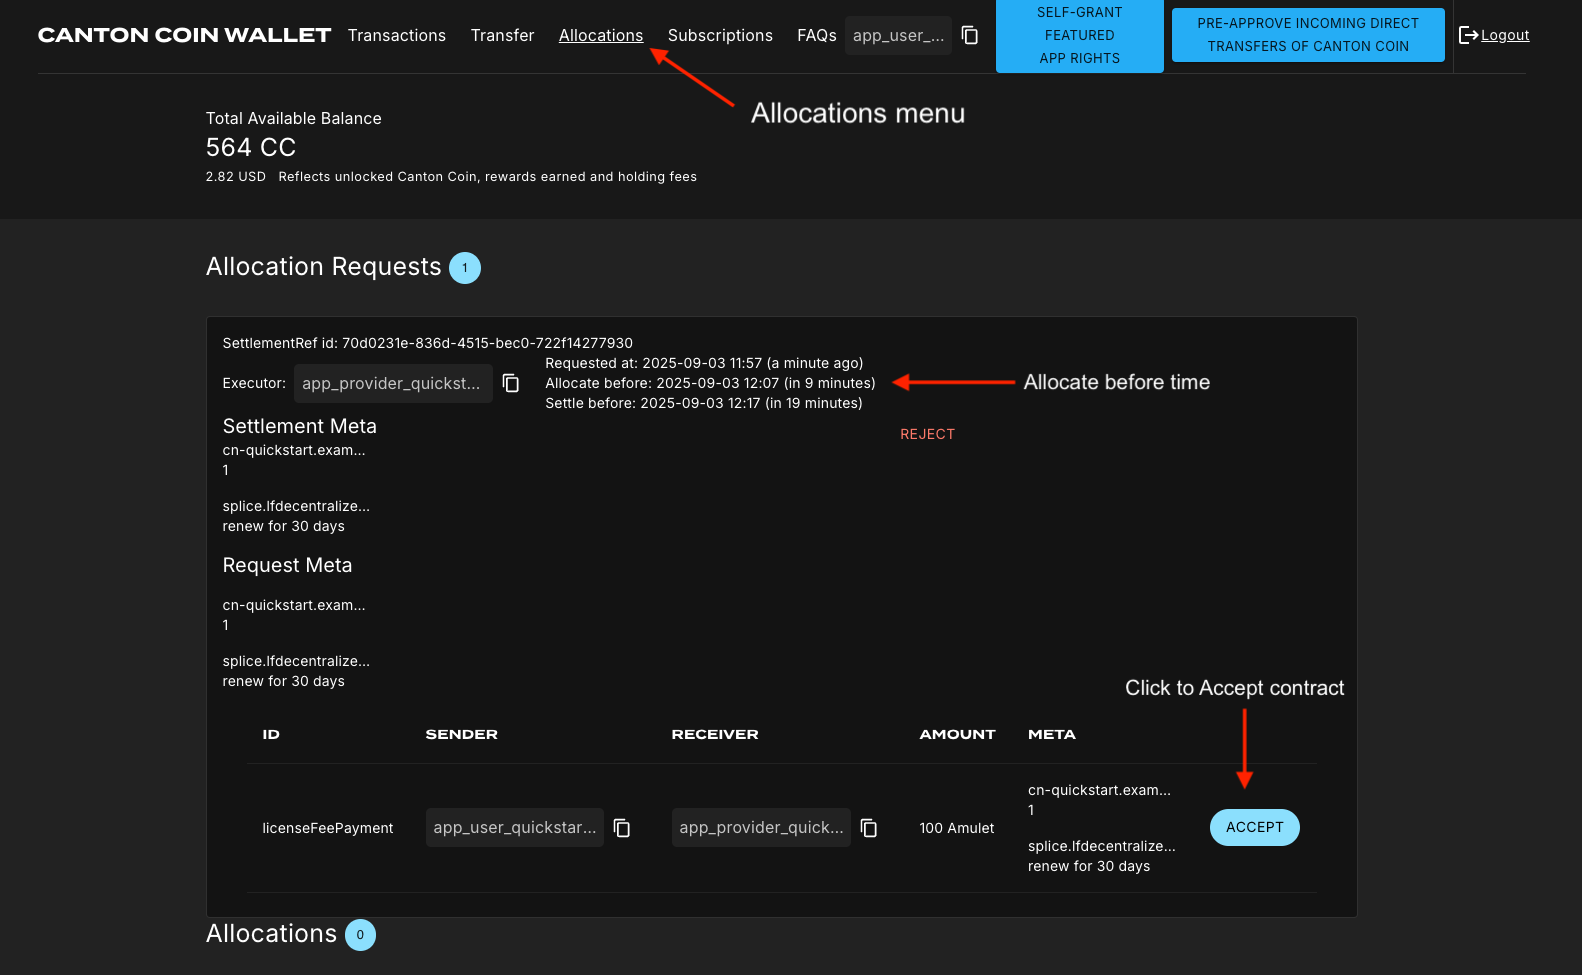
If the allocation request is accepted, a new “Allocations” section appears.
This section shows the licenseFeePayment information.
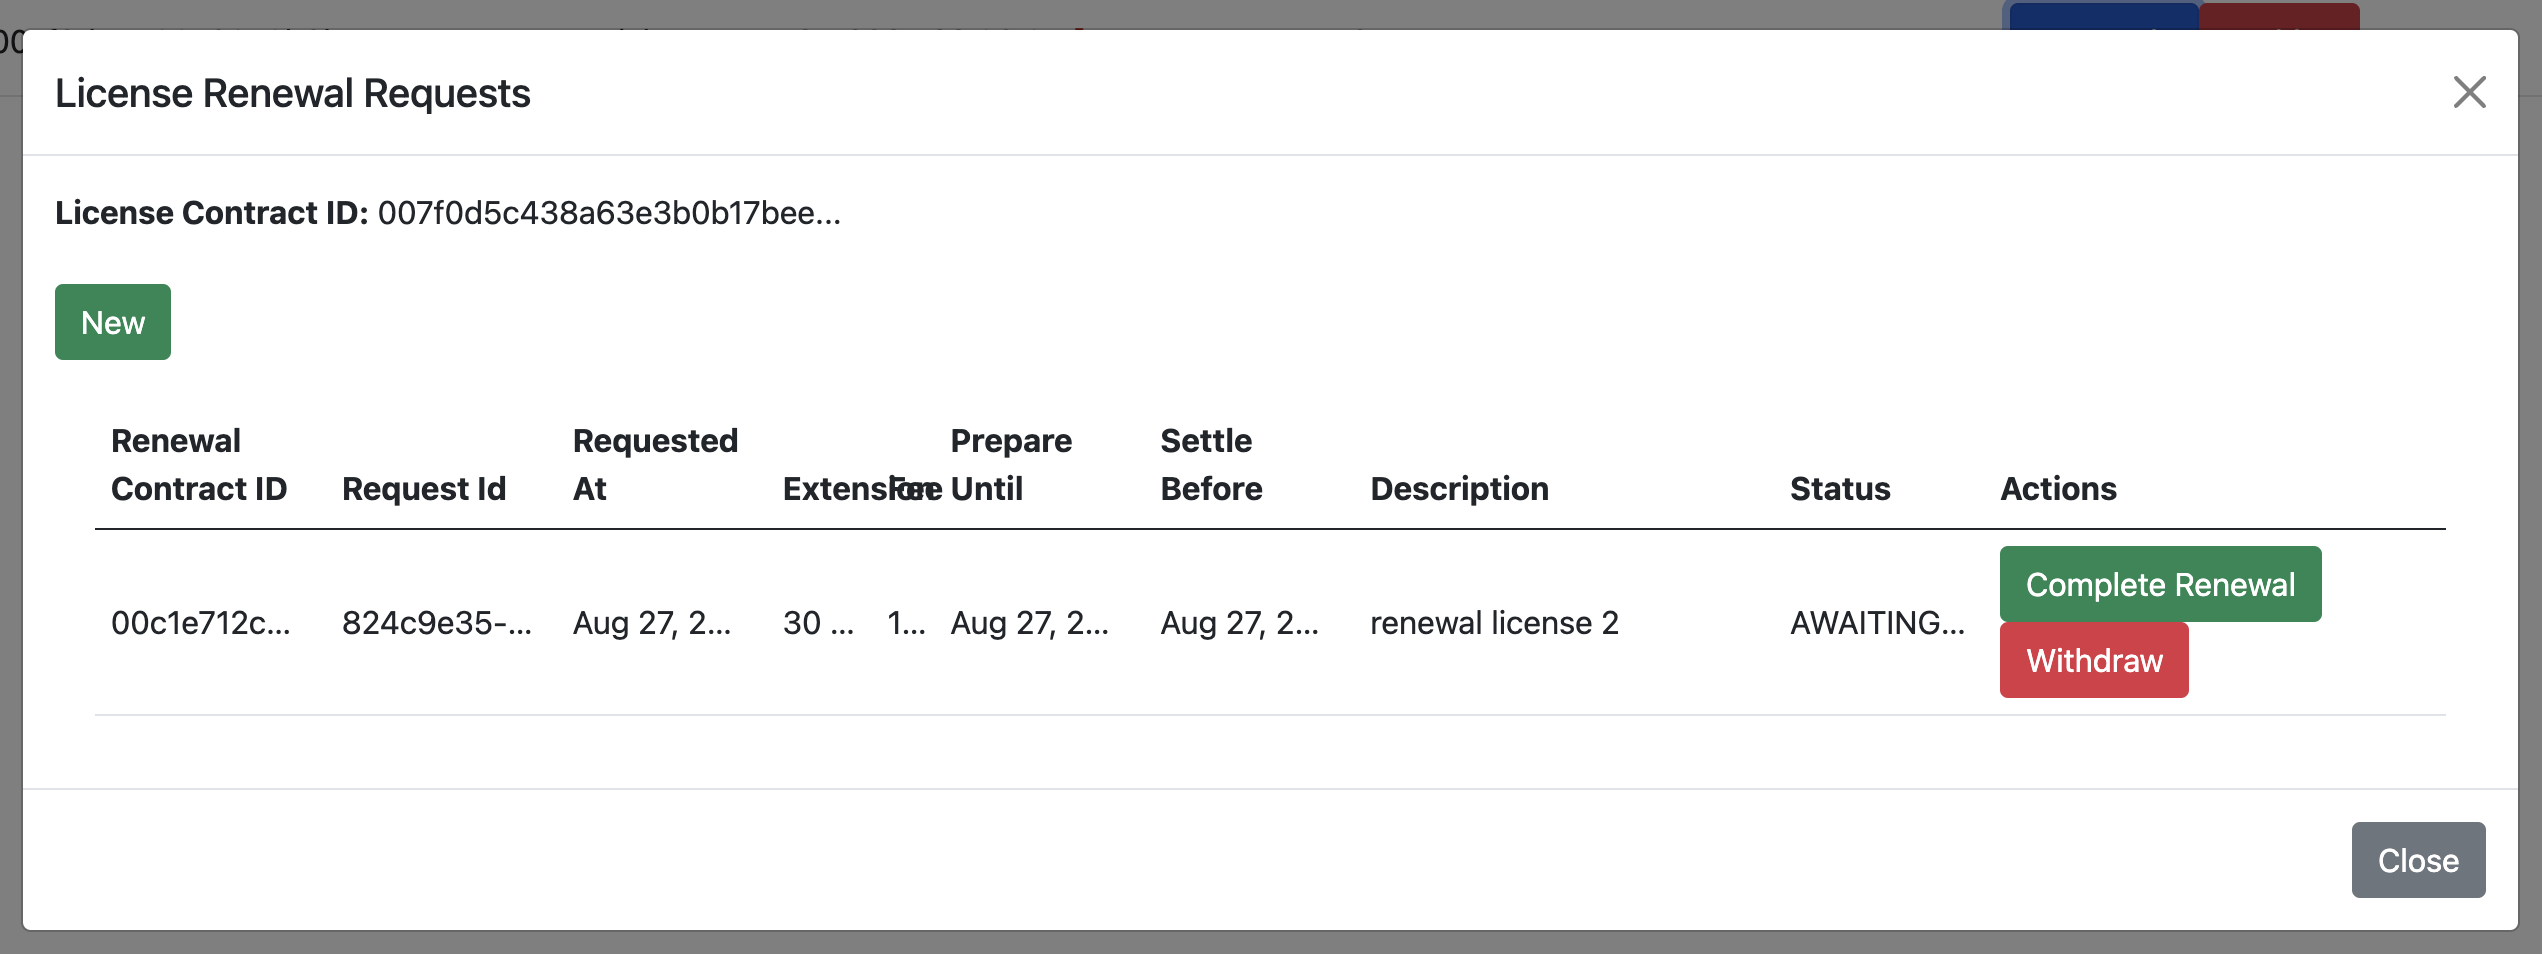
Renew the license
Return to the Quickstart as the AppProvider.
In the Licenses menu, select Renewals.
This opens the License Renewals Request modal.
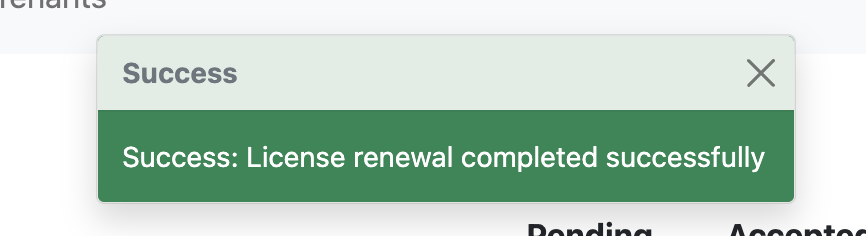
Click the green Complete Renewal button.
A confirmation appears that the license renewal completed successfully.
Log out from the AppProvider and log in as AppUser.
OAUTH2 disabled
If OAUTH2 is disabled, simply log in as app-user.
OAUTH2 enabled
When OAUTH2 is enabled, you log in using the app-user username and password.
Login as AppUser with “app-user” as the username and the password is “abc123”.
The AppInstall now shows as accepted.
The license shows as active.

Congratulations. You’ve successfully created and activated a license with a payment allocation in Canton wallet!
Canton Console
The Canton Console connects to the running application ledger. The console allows a developer to bypass the UI to interact with the CN in a more direct manner. For example, in Canton Console you can connect to the Participant to see the location of the Participant and their synchronizer domain.
Activate the Canton Console in a terminal from the quickstart/ directory.
Run:
make canton-console
After the console initiates, run the participants and participants.all commands, respectively.
participants
Returns a detailed categorization of participants.
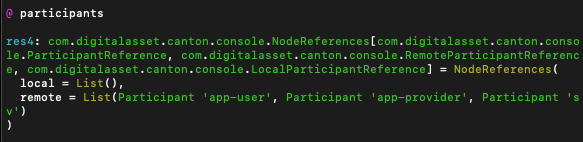
participants.all
Shows a list of all participant references.

On LocalNet, you can connect to any of the listed participants.
Connect to the app user’s validator with
`app-user`

If you receive an error, double check that you used the backticks.
The app provider can be connected with:
`app-provider`

Connect to the Super Valdiator that is simulating the Global Synchronizer using:
`sv`

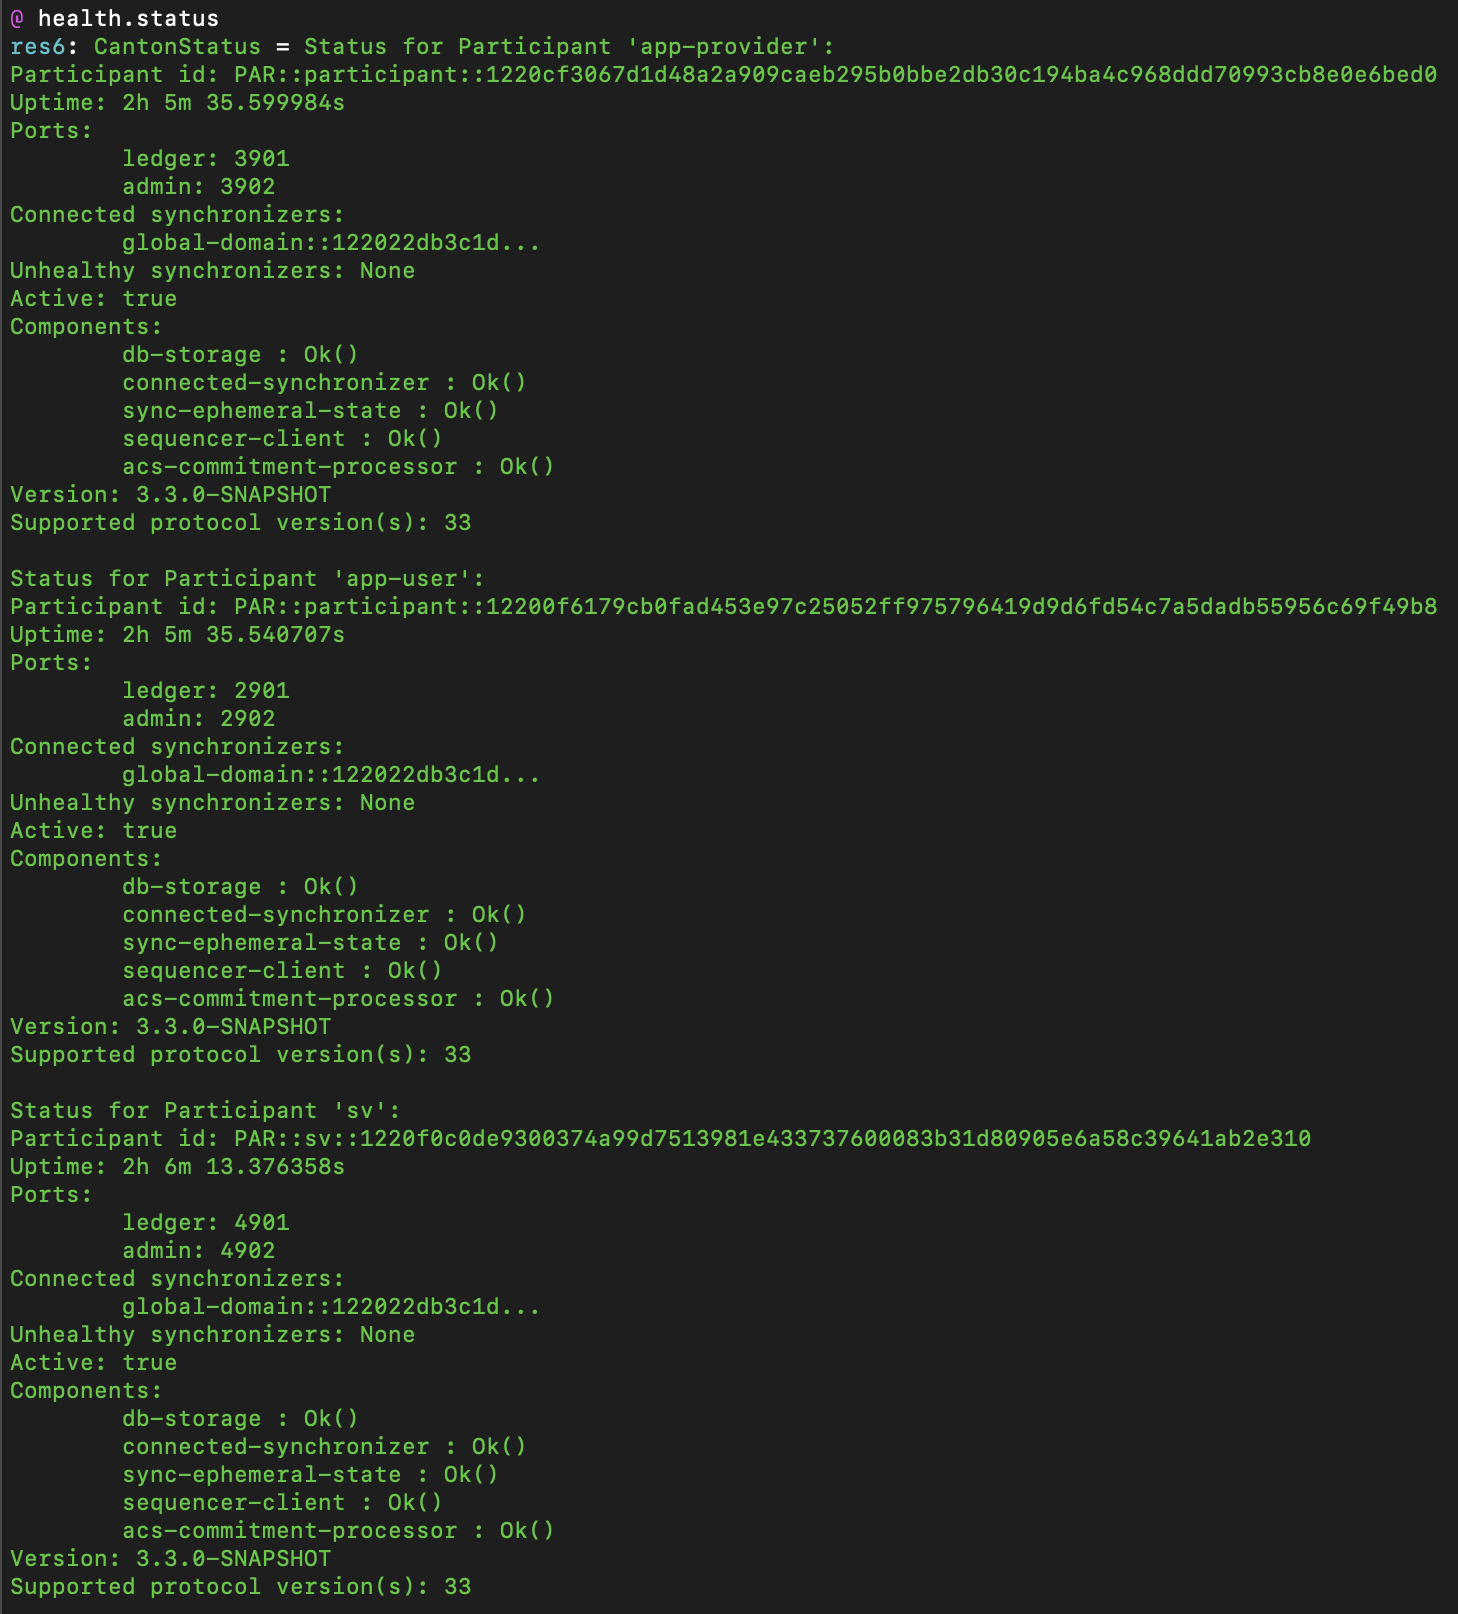
Canton Console also provides a diagnostic tool that displays the health of Canton Network validators:
health.status
Daml Shell
The Daml Shell connects to the running PQS database of the application provider’s Participant. In the Shell, the assets and their details are available in real time.
Run the shell from quickstart/ in the terminal with:
make shell
Run the following commands to see the data:
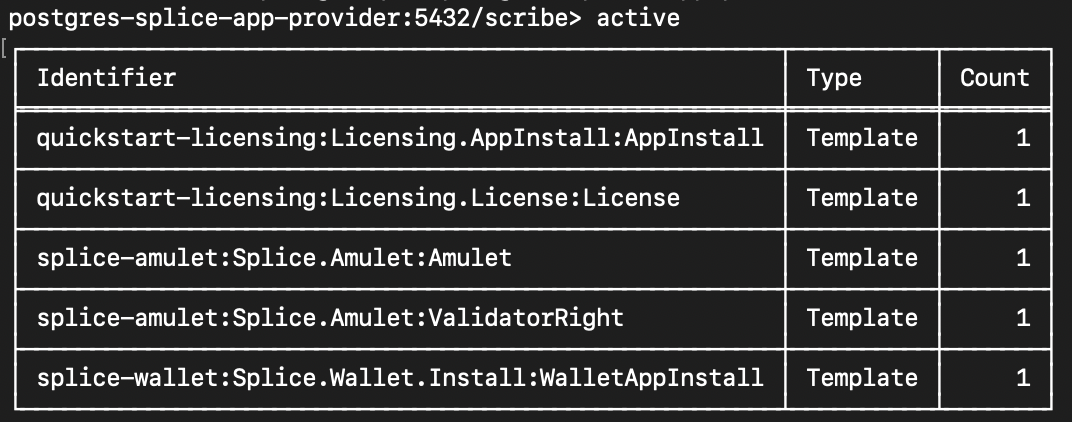
active
Shows unique identifiers and the asset count:
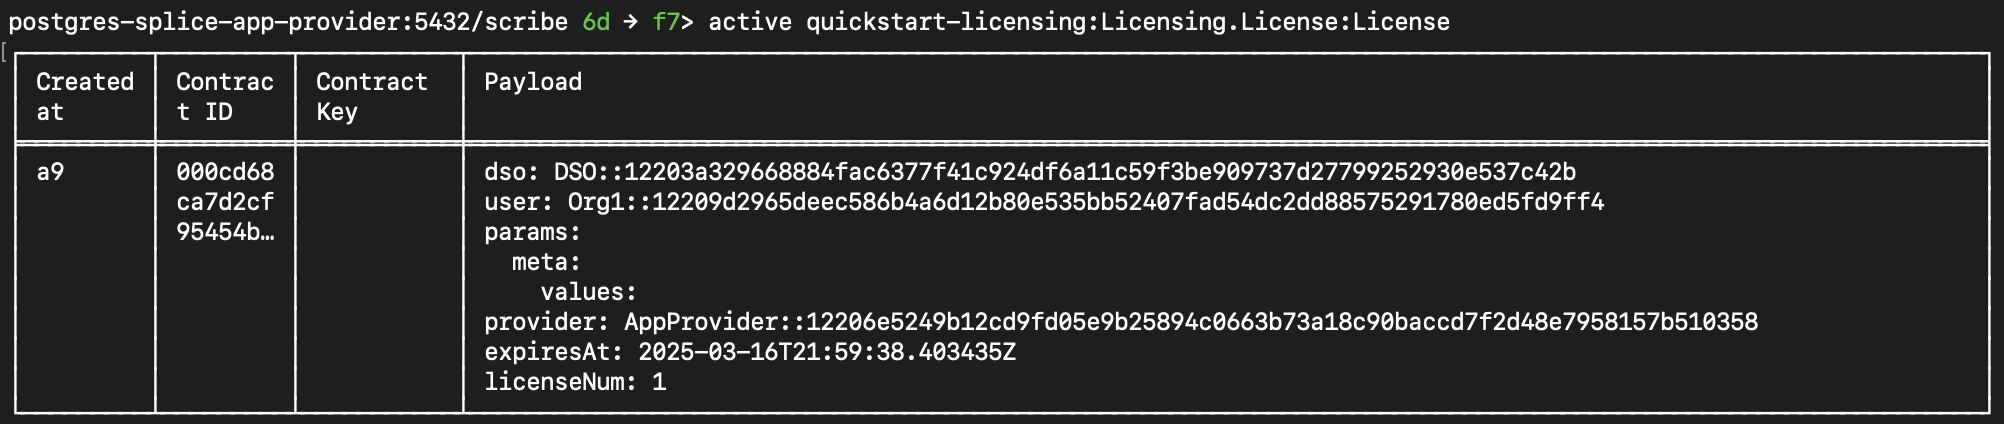
active quickstart-licensing:Licensing.License:License
List the license details.
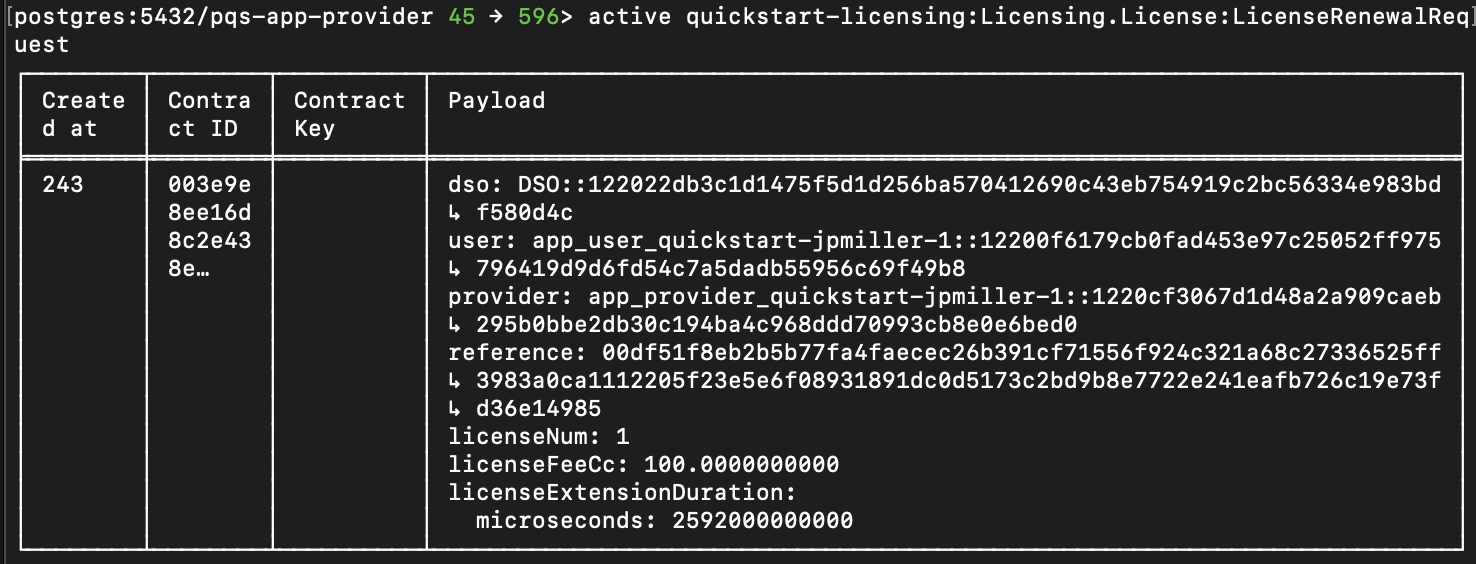
active quickstart-licensing:Licensing.License:LicenseRenewalRequest
Displays license renewal request details.
archives quickstart-licensing:Licensing.AppInstall:AppInstallRequest
Shows any archived license(s).

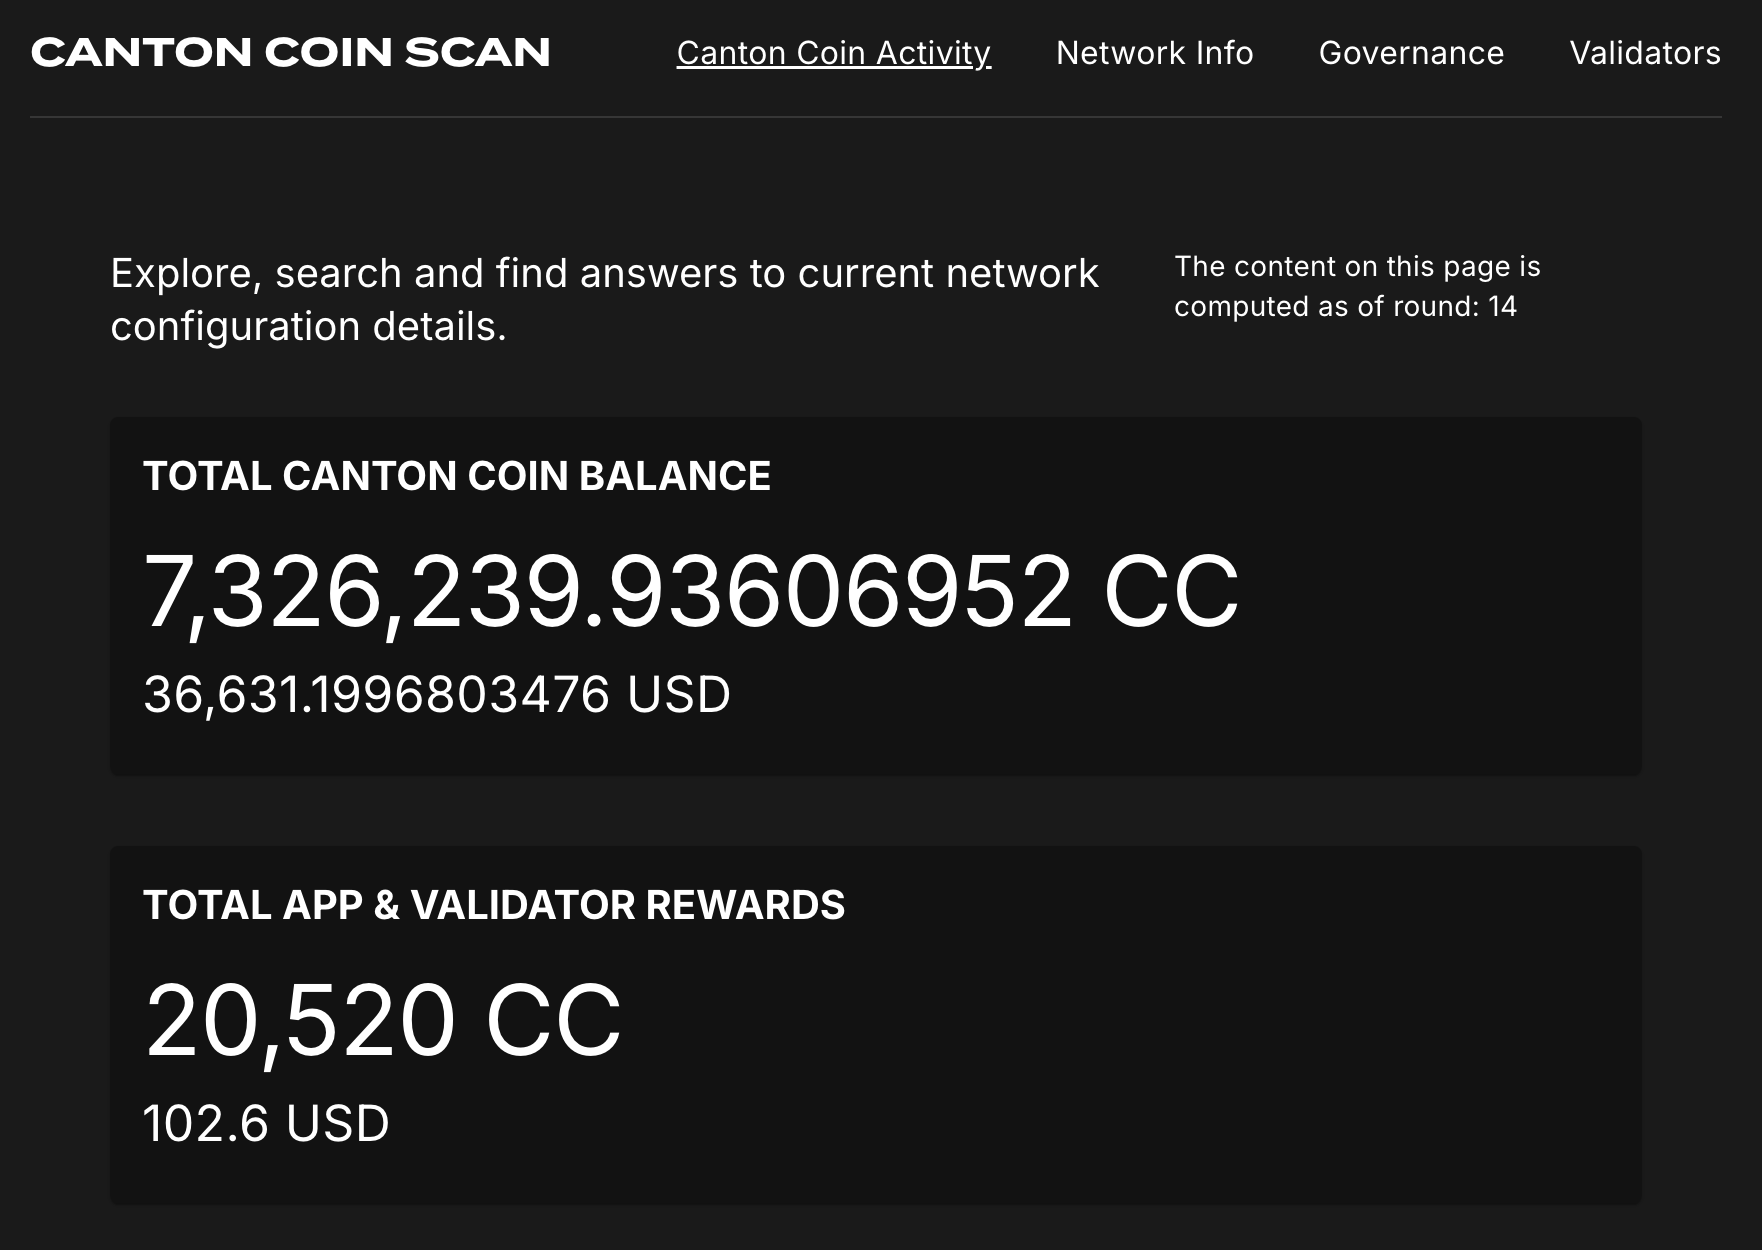
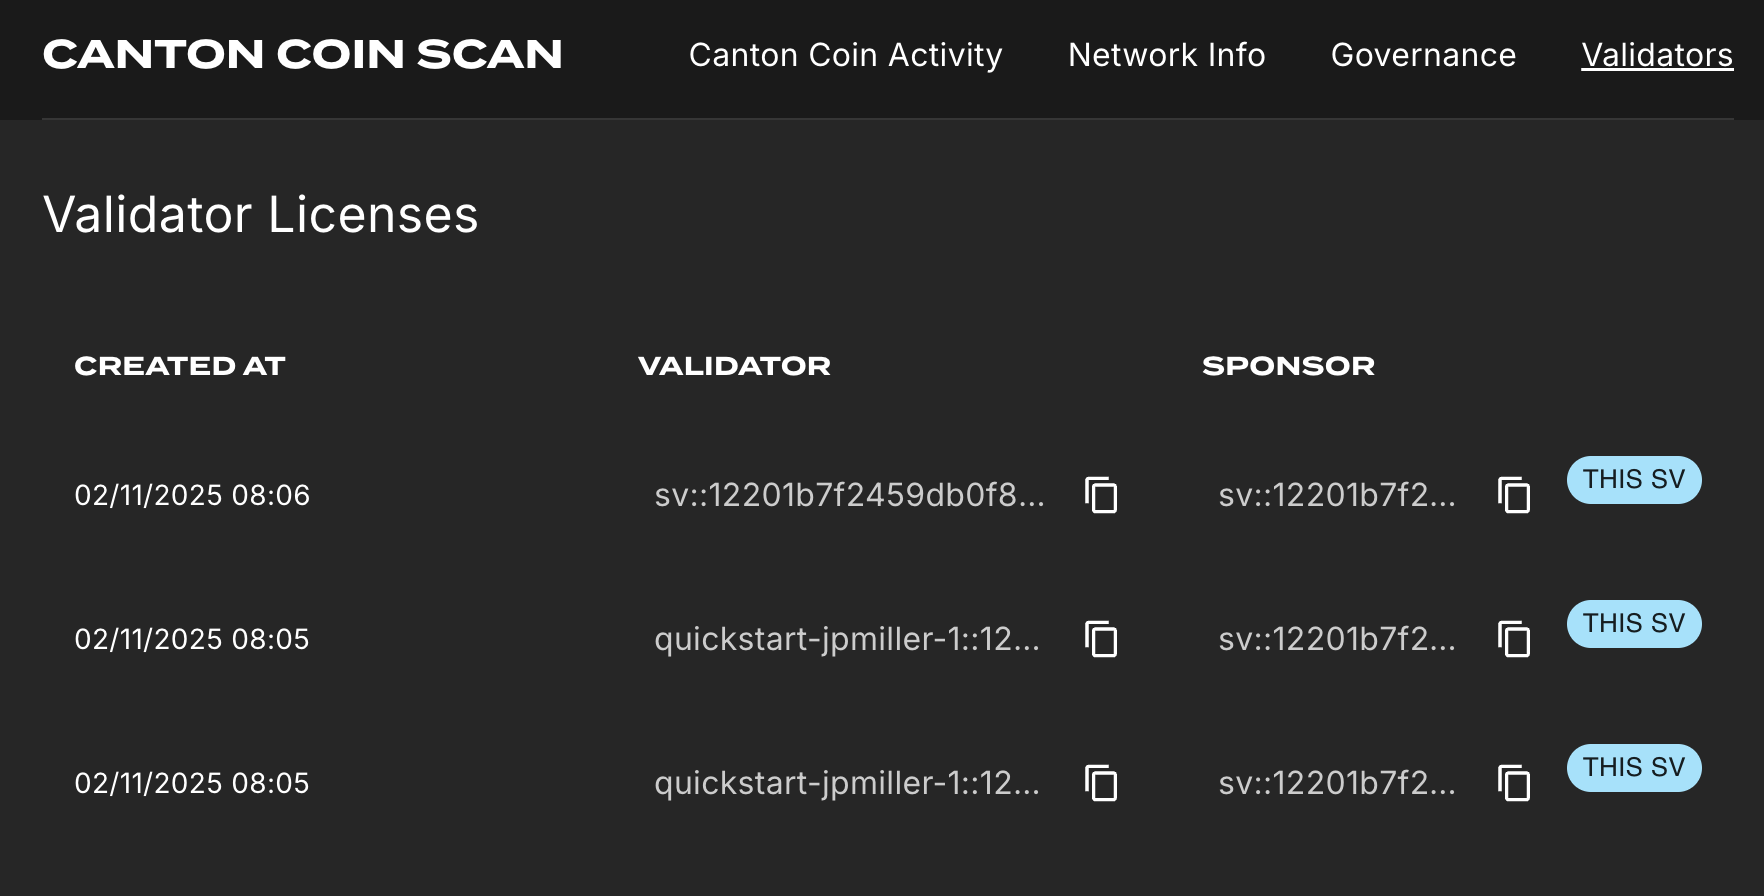
Canton Coin Scan
Explore the CC Scan Web UI at http://scan.localhost:4000/.
The default activity view shows the total CC balance and the Validator rewards.
Select the Network Info menu to view SV identification.
The Validators menu shows that the local validator has been registered with the SV.
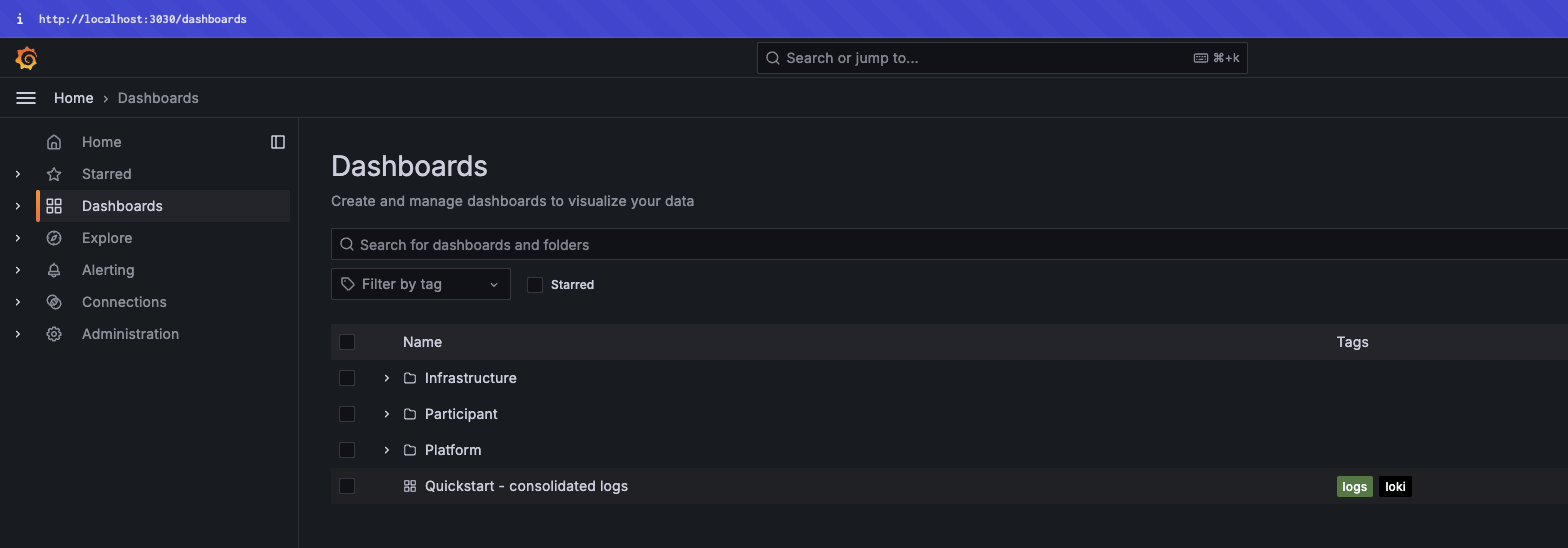
Observability Dashboard
Note
Observability may no longer work while App Quickstart is under revisions.
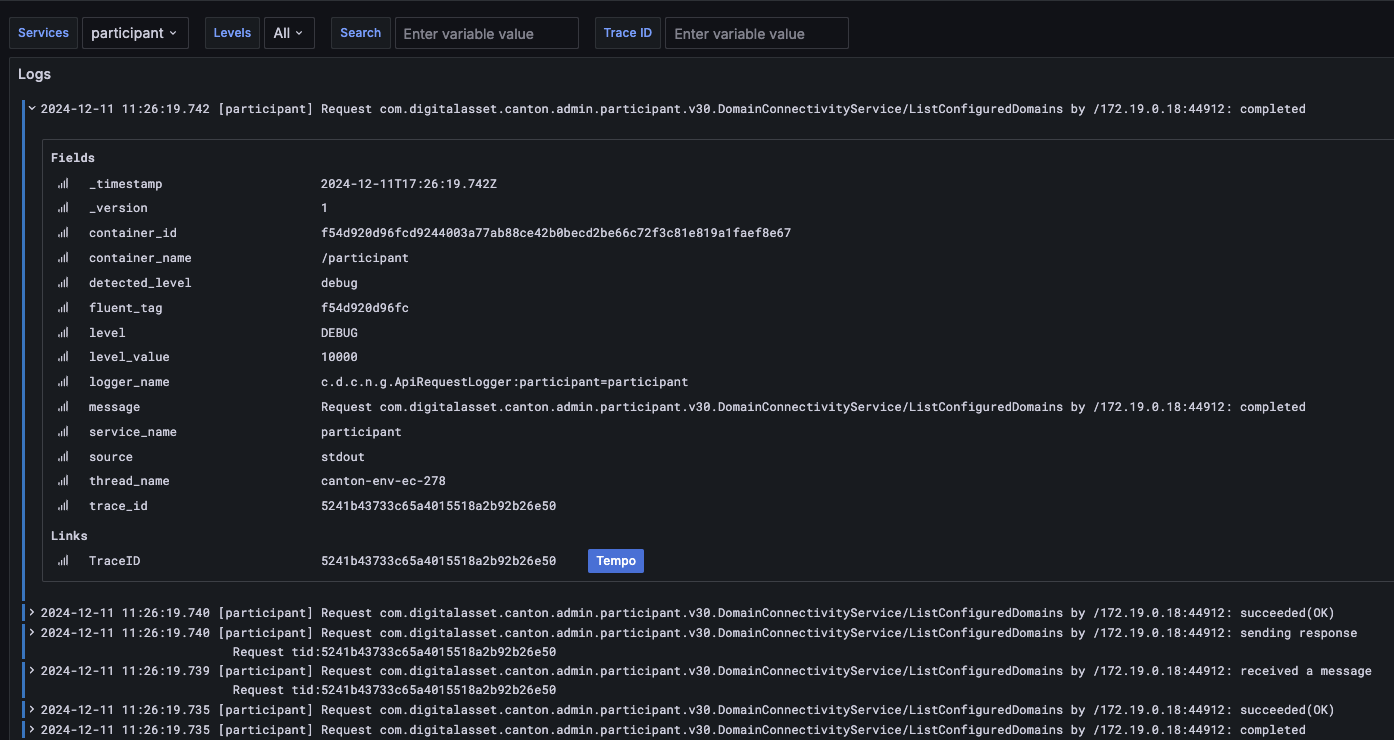
In a web browser, navigate to http://localhost:3030/dashboards to view the observability dashboards. Select Quickstart - consolidated logs.
The default view shows a running stream of all services.
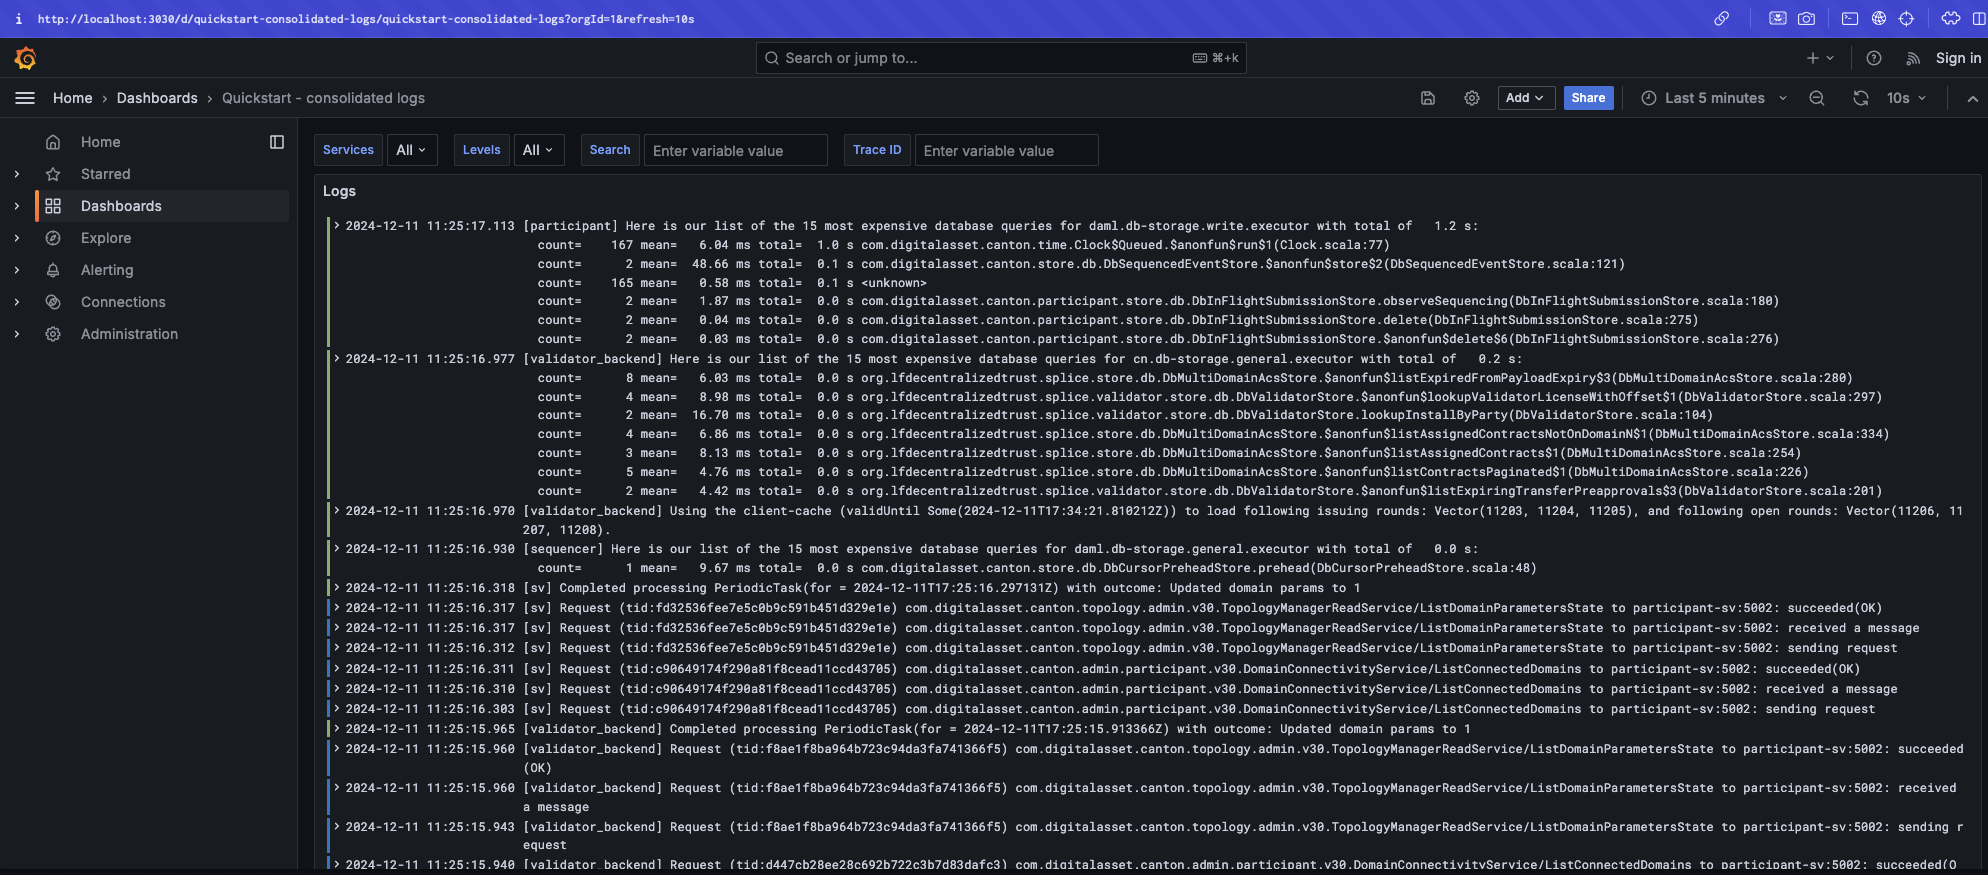
Change the services filter from “All” to “participant” to view participant logs. Select any log entry to view its details.
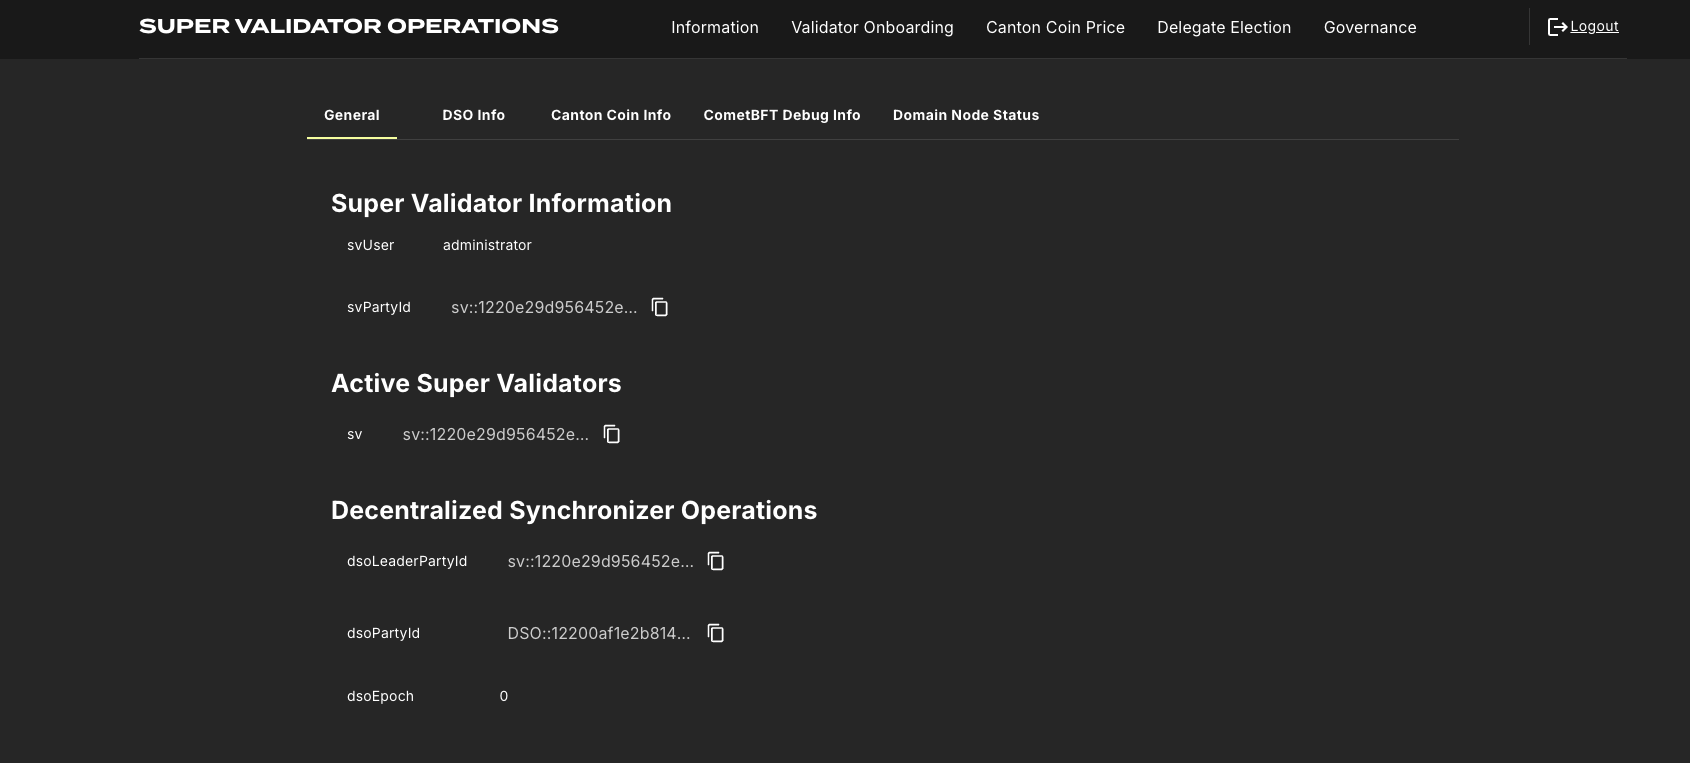
SV UIs
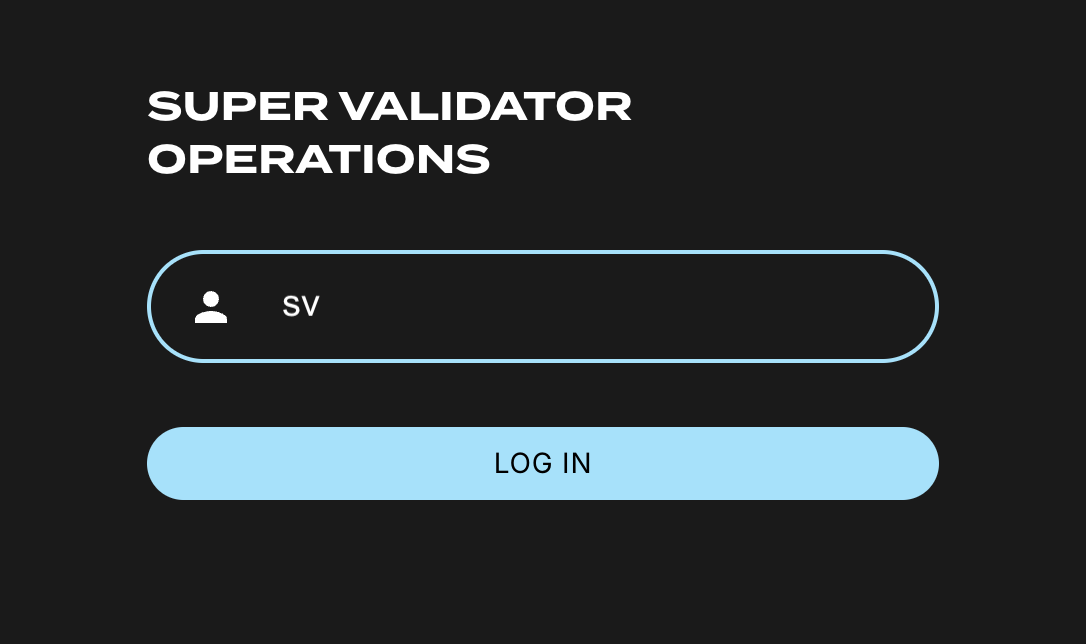
Navigate to http://sv.localhost:4000/ for the SV Web UI. The SV view displays data directly from the validator in a GUI that is straightforward to navigate.
Login as ‘sv’.
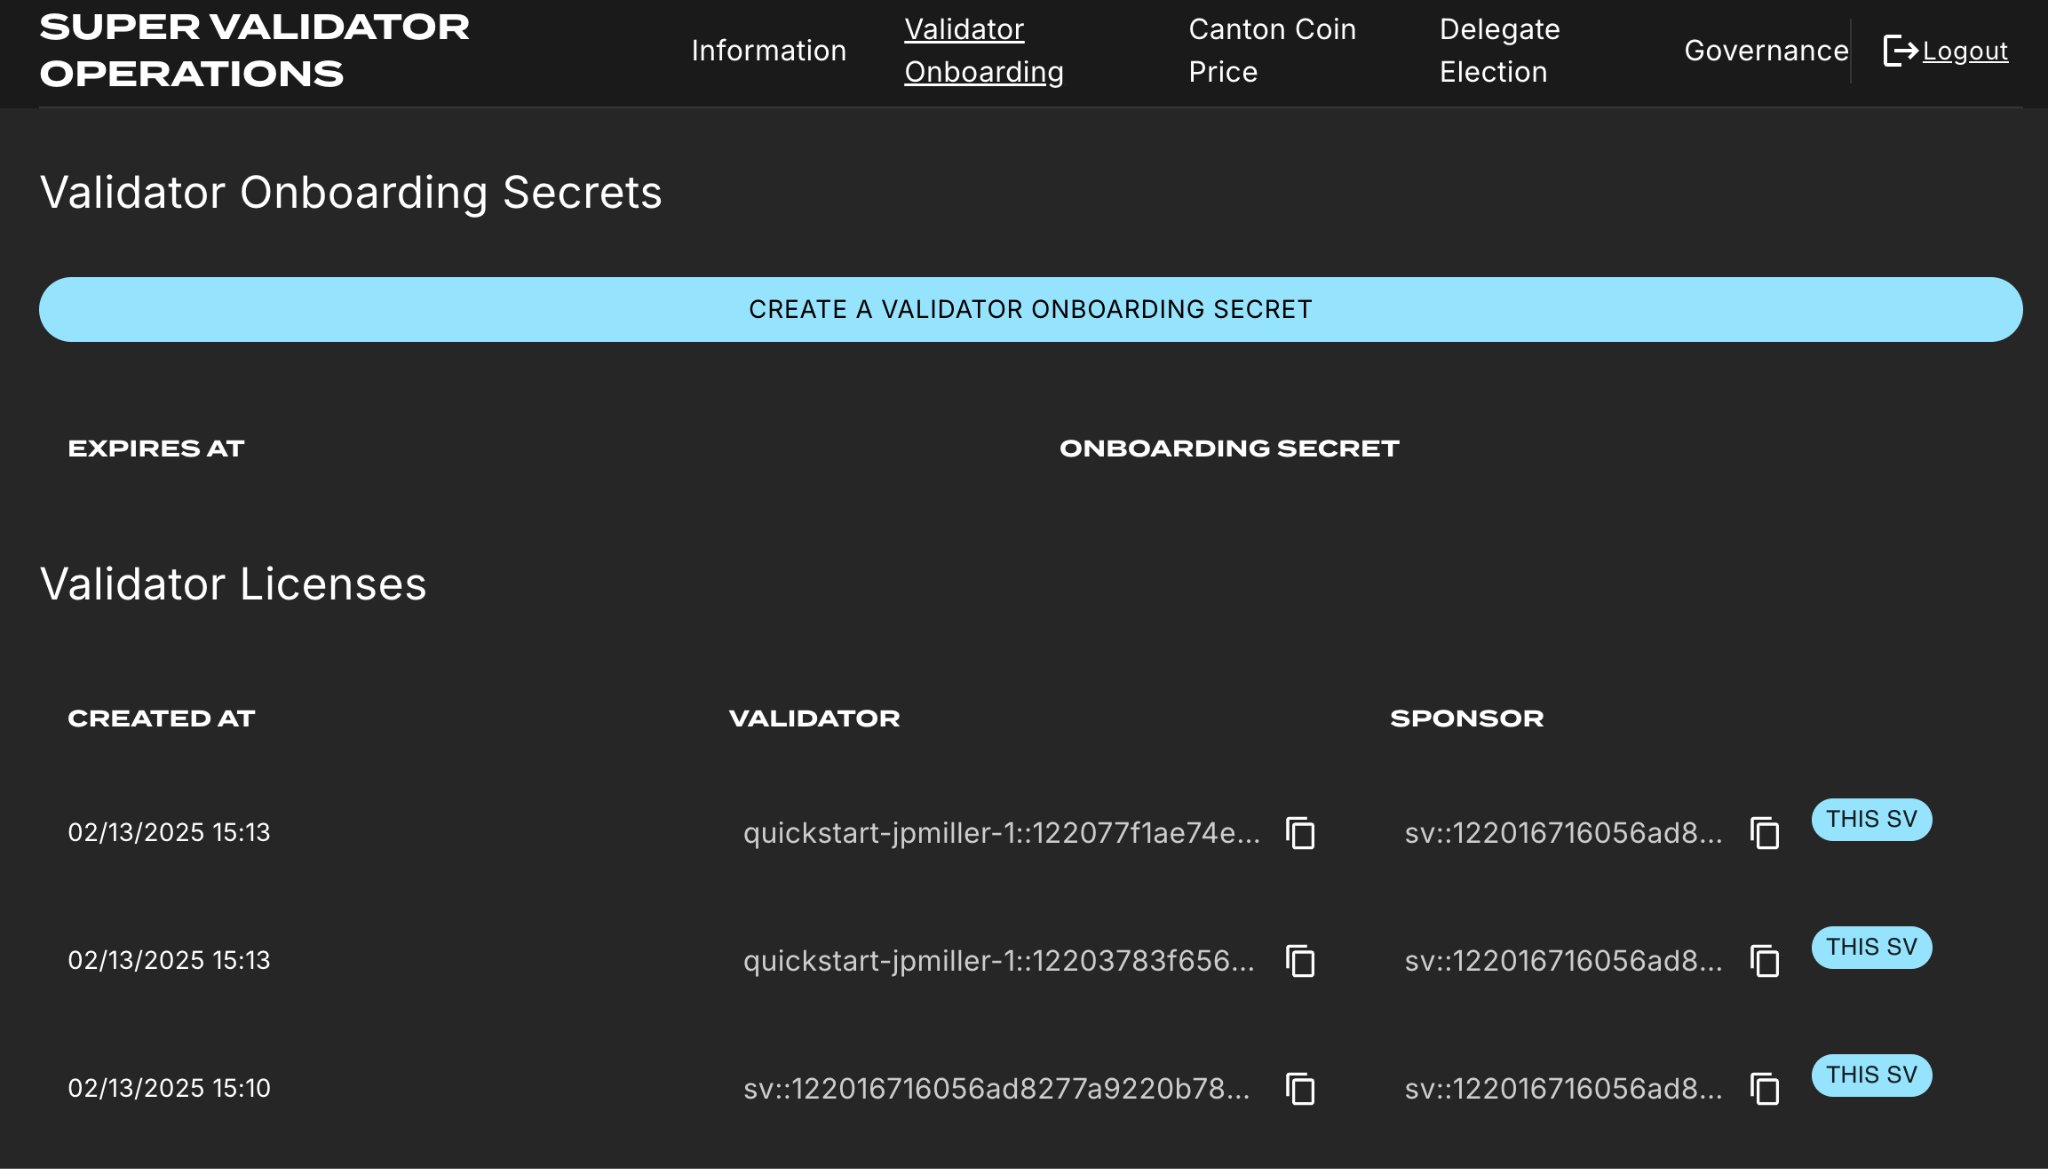
The UI shows information about the SV and lists the active SVs.
The Validator Onboarding menu allows for the creation of validator onboarding secrets.
Next steps
You’ve completed a business operation in the CN App Quickstart and have been introduced to the basics of the Canton Console and Daml Shell. We encourage you to explore the CN App Quickstart codebase and modify it to meet your business needs. You might be interested in learning more about the App Quickstart Canton Network quickstart project structure or the Development journey in the CN Quickstart lifecycle.